Android Tutorial , Programming Tutorial, Php Tutorial, Learn Android, HTML Tutorial, Coding , Java Tutorial, GTU Programs, Learning Programming

Saturday 29 October 2016

How to store image in database in Php

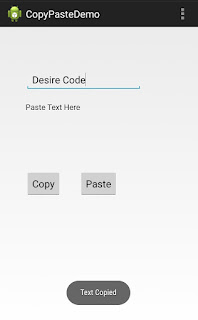
In this example, we are learning to how to store image in database using Php.

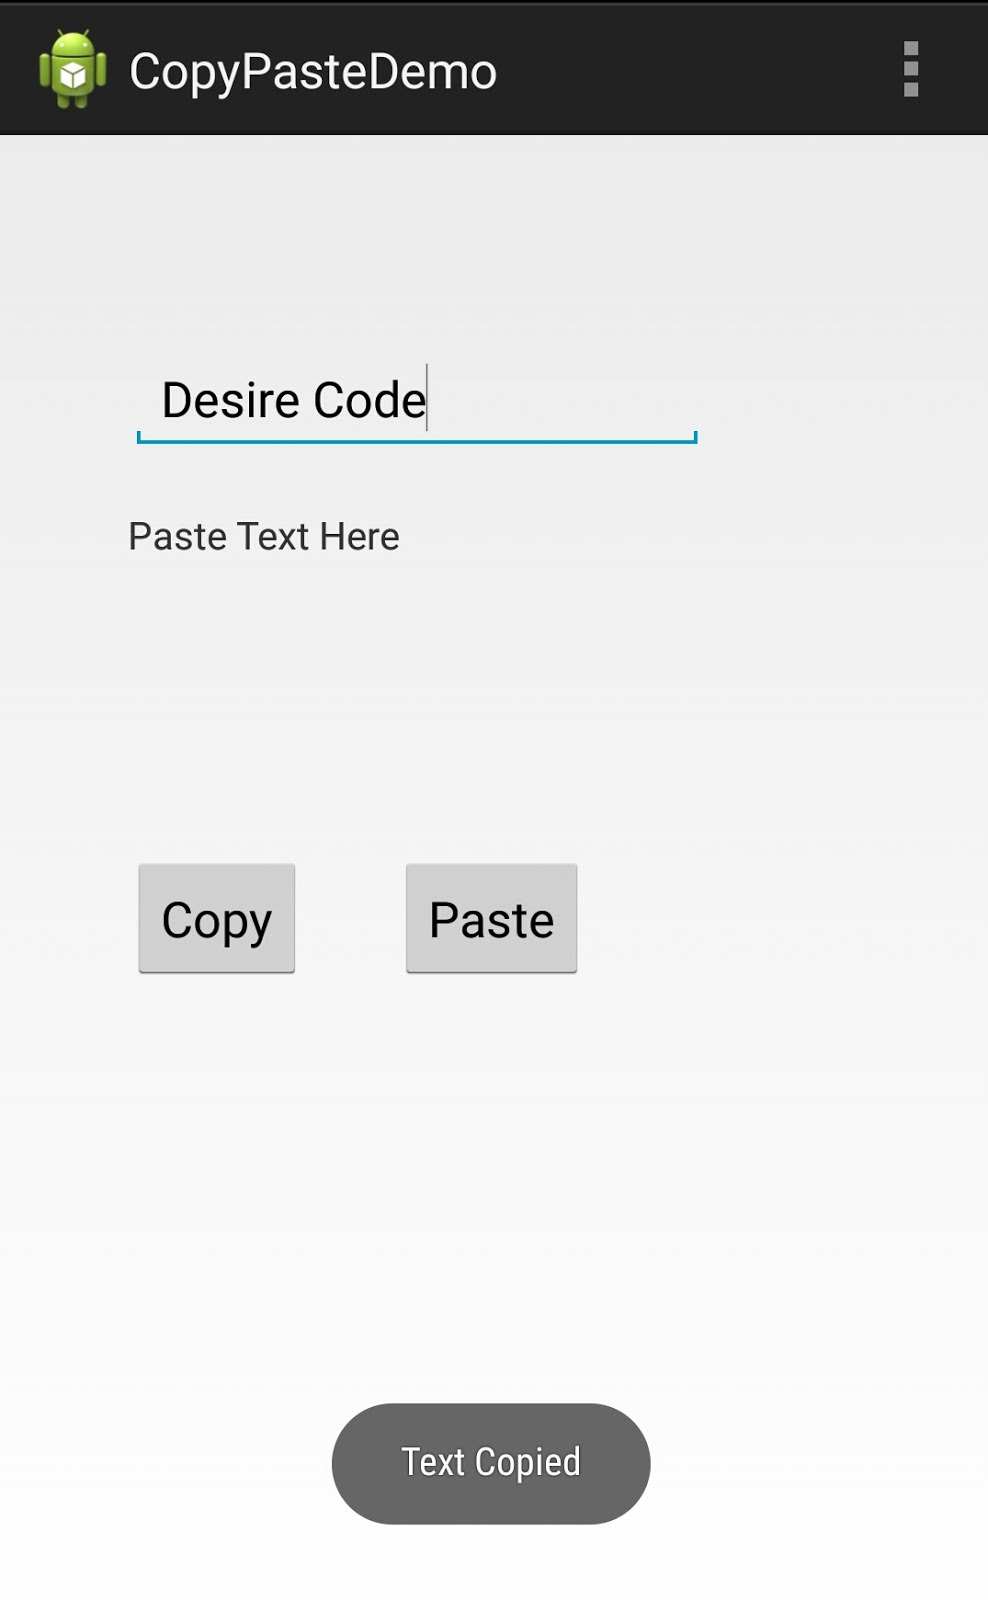
First of all, create a folder of images name where your code file available. After create a database with two column of id and name.

We are storing just path of the image and give id of the image in database.

Let's see the example that how it works :

file name : index.php

 1
 2
 3
 4
 5
 6
 7
 8
 9
10
11
12
13
<HTML>
<BODY>
<FORM METHOD="POST" ACTION="image_upload.PHP"  enctype="multipart/form-data">
 <pre>
  Example of Image Upload<br>
  ID   : <INPUT TYPE='TEXT' NAME='ID'> <br/>
  Image:<input name="uploadedfile" type="file" /> <br/>
  <INPUT TYPE="SUBMIT" VALUE="Insert"> <INPUT TYPE="RESET" VALUE="CLEAR">
 </pre>
</FORM>

</BODY>
</HTML>


file name : image_upload.php

 1
 2
 3
 4
 5
 6
 7
 8
 9
10
11
12
13
14
15
16
17
18
19
20
21
22
23
24
25
26
27
28
29
30
31
32
33
34
35
<?php
 $id=$_POST['ID'];
 $conn=mysql_connect("localhost","root","");
 mysql_select_db("demo");

 $fn=basename($_FILES['uploadedfile']['name']);
 $target_path = "./images/";

 $target_path = $target_path.$fn; 

 $tfn=$_FILES['uploadedfile']['tmp_name'];

 
  $x=move_uploaded_file($tfn,$target_path);

 if($x) 
 {
  echo "<img src='images/".basename($_FILES['uploadedfile']['name'])."'</img> ";
    echo "<br>The file <u>[".basename($_FILES['uploadedfile']['name'])."</u>] has been uploaded<br>";
 }
 else
 {
     echo "There was an error uploading the file, please try again!";
  die;
 }

 $insert="insert into img values($id,'$fn')";

 mysql_query($insert) or die("INSERT ".mysql_error());
 mysql_query("commit") or die("commit fail ".mysql_error());
 
 echo "<br>Record Successfully Added"; 

?>
<a href="index.php">Back to Home</a>


Output :


Note :
database name : demo
table name : img
field name : id (varchar) , name (varchar)

Thursday 27 October 2016

Delete selected row record from database in php

In this example , we are learning about how to delete selected row record from database in php.

Here, we are fetching record from database. If database not available then create a database and add records. then put link of delete record in each row.

Here, I create a database login_tbl  which have 3 column of id,name,molbile.

From first file , If you delete 1st record then id of the first record pass by query string on second page and delete selected record.

Let's see the example :

File name : index.php


 1
 2
 3
 4
 5
 6
 7
 8
 9
10
11
12
13
14
15
16
17
18
19
20
21
22
23
24
25
26
27
28
<?php
 $servername= "localhost";
 $username = "root";
 $password="";
 $dbname="demo";
 $conn = new mysqli($servername,$username,$password,$dbname);  
?>
<FORM METHOD="POST" enctype="multipart/form-data">  
  <?php
   $sql = "SELECT *FROM login_tbl";
   $result = $conn->query($sql);

   echo "<table border='1' style='width:50%'><tr><th>ID</th><th>Name</th><th>Mobile</th><th>Delete</th></tr>";
   if ($result->num_rows > 0)
   {
     // output data of each row
     while($row = $result->fetch_assoc())
     {
      echo "<br><tr><td align='center'>".$row["id"]." </td><td align='center'>".$row["name"]."</td><td align='center'>".$row["mobile"]."</td><td align='center'><a href='delete.php?id=".$row["id"]."'>Delete</td><br>";
     }
   }
   else
   {
     echo "No data available";
   }
   echo "</table>";
  ?>
</FORM>


File name : delete.php


 1
 2
 3
 4
 5
 6
 7
 8
 9
10
11
<?php
 $id= $_GET['id'];
 $cn=mysql_connect("localhost","root","");
 mysql_select_db("demo");
 $s1="delete from login_tbl where id=".$id;

 mysql_query($s1) or die("INSERT ".mysql_error());
 mysql_query("commit") or die("commit fail ".mysql_error());
 
 header("Location: index.php");
?>

Output :


  • Before delete record


  • After delete record


Wednesday 26 October 2016

How to use Color Dialog Box in C#

In this example, we are learning that how to use color dialog box control in c#.

First of all , we need to add Color Dialog Control in the form. In this example, one multi line textbox and two buttons were added in the form.


After adding the control, we are learning that how to change background color of textbox using color dialog box and also change font color of textbox.

When you click on the button color dialog box will be open and then you choose color. After selecting color, color will be change of textbox background color and font color.

Let's see the example :


 1
 2
 3
 4
 5
 6
 7
 8
 9
10
11
12
13
14
15
16
17
18
19
20
21
22
23
24
25
26
27
28
29
30
31
32
33
34
35
36
37
38
39
40
41
42
43
44
45
using System;
using System.Collections.Generic;
using System.ComponentModel;
using System.Data;
using System.Drawing;
using System.Linq;
using System.Text;
using System.Windows.Forms;

namespace Demo
{
    public partial class Form1 : Form
    {
        public Form1()
        {
            InitializeComponent();
        }

        private void background_color_Click(object sender, EventArgs e)
        {
            ColorDialog colorDlg = new ColorDialog();
            colorDlg.AllowFullOpen = true;
            colorDlg.AnyColor = true;
            colorDlg.SolidColorOnly = false;
            colorDlg.Color = Color.Red;
            if (colorDlg.ShowDialog() == DialogResult.OK)
            {
                textBox1.BackColor = colorDlg.Color;
            }
        }

        private void font_color_Click(object sender, EventArgs e)
        {
            ColorDialog colorDlg = new ColorDialog();
            colorDlg.AllowFullOpen = true;
            colorDlg.AnyColor = true;
            colorDlg.SolidColorOnly = false;
            colorDlg.Color = Color.Red;
            if (colorDlg.ShowDialog() == DialogResult.OK)
            {
                textBox1.ForeColor = colorDlg.Color;
            }
        }
    }
}

Output:

ColorDialogBox1

ColorDialogBox

Tuesday 25 October 2016

How to encrypt and decrypt password in php

In this example , we are learning how to encrypt and decrypt password in php.   

Php Provide md5() function to encrypt password. Using md5() function we can store data in encrypted format and can secure password using md5().

Let's see the Example :-

File Name : index.php


 1
 2
 3
 4
 5
 6
 7
 8
 9
10
<?php
$password = "Hello";
$encrypt = md5($password);
echo "Your password before encrypted is : ".$password."<br/>";
echo "Encrypted password [HELLO] : ".$encrypt."<br>";
if($encrypt == md5($password))
{
 echo "Your Decrypt password : ".$password;
}
?>

Output :


Saturday 22 October 2016

Add text from textbox in listbox Column in C#

In this example, We are learning how to add items in listbox from textbox on button click.

Let's see the example :

File Name : Form1.cs

 1
 2
 3
 4
 5
 6
 7
 8
 9
10
11
12
13
14
15
16
17
18
19
20
21
22
23
24
25
26
27
28
29
30
31
using System;
using System.Collections.Generic;
using System.ComponentModel;
using System.Data;
using System.Drawing;
using System.Linq;
using System.Text;
using System.Threading.Tasks;
using System.Windows.Forms;

namespace Item_Add_ListBox
{
    public partial class Form1 : Form
    {
        public Form1()
        {
            InitializeComponent();
        }

        private void button1_Click(object sender, EventArgs e)
        {
            item_listbox.Items.Add(txt_item_add.Text);
            txt_item_add.Text = "";
            
            //item_listbox = name of listbox
            //txt_item_add = name of textbox


        }
    }
}

Output :

Listbox add item

ListBox Item add


Wednesday 19 October 2016

PHP Login Example with session

In this example, we are learning about how to create login form with session using Php.


  • Session is one type of way which is used to store information to be used in multiple pages. Session is used to store some details about purchasing product in any website , store username, pass data in multiple forms , etc.

  • for staring session in file , session_start() function is used. to set value in session variable, $_SESSION php variable is used.

  • for destroy session , session_destroy() function is used.

Let's see the example :

File Name : file1.php

 1
 2
 3
 4
 5
 6
 7
 8
 9
10
11
12
13
14
15
16
17
18
19
20
<?php
session_start(); //start session
if(isset($_POST['click']))
{
 $_SESSION['user']=$_POST['username']; //set value of username in session varible
 header("Location:file2.php");
 exit;
}
?>

<html>
 <body>
  <form method="post">
   <input type="text" placeholder="Enter Username" name="username"/><br/>
   <input type="password" placeholder="Enter Password" name="password" /><br/>
   <input type="submit" name="click" value="Click Here">
   <input type="reset" name="cancel" value="Cancel">
  </form>
 </body>
</html>

File Name : file2.php


1
2
3
4
<?php
session_start();
echo "WELCOME ".$_SESSION['user'];
?>


Output :-


file1.php


file2.php


Friday 14 October 2016

Spinner Example in Android

Spinner is a one type of drop down menu which is allow you to select an item from menu. In this Example, On Item select of Spinner , Background color will be changed with image.

First of all, when you select Red then background color will be changed and set red color and image of red circle will be set in Image View. As the same , Select on Green , background color will be set green and green circle set in Imageview.

Using This Example, We can change background color of the layout on item select in spinner.

So, Let's now see the example :

File Name : MainActivity.java


 1
 2
 3
 4
 5
 6
 7
 8
 9
10
11
12
13
14
15
16
17
18
19
20
21
22
23
24
25
26
27
28
29
30
31
32
33
34
35
36
37
38
39
40
41
42
43
44
45
46
47
48
49
50
51
52
53
54
55
56
57
58
59
60
61
62
63
64
65
66
67
68
69
70
71
72
73
74
75
76
77
78
79
80
81
82
83
84
85
package com.example.spinnerdemo;

import java.util.ArrayList;
import java.util.List;

import android.app.Activity;
import android.graphics.Color;
import android.os.Bundle;
import android.view.Menu;
import android.view.View;
import android.widget.AdapterView;
import android.widget.AdapterView.OnItemSelectedListener;
import android.widget.ArrayAdapter;
import android.widget.ImageView;
import android.widget.RelativeLayout;
import android.widget.Spinner;
import android.widget.Toast;

public class MainActivity extends Activity {

 Spinner spinner;
 RelativeLayout r1;
 ImageView i1;
 @Override
 protected void onCreate(Bundle savedInstanceState) {
  super.onCreate(savedInstanceState);
  setContentView(R.layout.activity_main);
  
  spinner = (Spinner)findViewById(R.id.spinner1);
  r1 = (RelativeLayout)findViewById(R.id.r1);
  i1 = (ImageView)findViewById(R.id.imageView1);
  List<String> list = new ArrayList<String>();
     list.add("RED");
     list.add("GREEN");
     list.add("BLUE");
      
     ArrayAdapter<String> dataAdapter = new ArrayAdapter<String>(this, android.R.layout.simple_spinner_item, list);
     spinner.setAdapter(dataAdapter);
     
  spinner.setOnItemSelectedListener(new OnItemSelectedListener() {

   @Override
   public void onItemSelected(AdapterView<?> arg0, View arg1,
     int arg2, long arg3) {
    // TODO Auto-generated method stub
    
     String item =arg0.getItemAtPosition(arg2).toString(); 
     Toast.makeText(getApplicationContext(), "Selected: " + item, Toast.LENGTH_LONG).show();
    
     if(item == "RED")
     {
      r1.setBackgroundColor(Color.RED);
      i1.setBackgroundResource(R.drawable.red);
     }
     if(item == "GREEN")
     {
      r1.setBackgroundColor(Color.GREEN);
      i1.setBackgroundResource(R.drawable.green);
     }
     if(item == "BLUE")
     {
      r1.setBackgroundColor(Color.BLUE);
      i1.setBackgroundResource(R.drawable.blue);
     }
   }

   @Override
   public void onNothingSelected(AdapterView<?> arg0) {
    // TODO Auto-generated method stub
    
   }
  });


 }

 @Override
 public boolean onCreateOptionsMenu(Menu menu) {
  // Inflate the menu; this adds items to the action bar if it is present.
  getMenuInflater().inflate(R.menu.activity_main, menu);
  return true;
 }

}

File Name : activity_main.xml


 1
 2
 3
 4
 5
 6
 7
 8
 9
10
11
12
13
14
15
16
17
18
19
20
21
22
23
24
<RelativeLayout xmlns:android="http://schemas.android.com/apk/res/android"
    xmlns:tools="http://schemas.android.com/tools"
    android:layout_width="match_parent"
    android:layout_height="match_parent"
    android:id="@+id/r1"
    tools:context=".MainActivity" >

    <Spinner
        android:id="@+id/spinner1"
        android:layout_width="wrap_content"
        android:layout_height="wrap_content"
        android:layout_alignParentLeft="true"
        android:layout_alignParentTop="true" />

    <ImageView
        android:id="@+id/imageView1"
        android:layout_width="100dp"
        android:layout_height="100dp"
        android:layout_below="@+id/spinner1"
        android:layout_centerHorizontal="true"
        android:layout_marginTop="92dp"
         />

</RelativeLayout>

Output :

Thursday 13 October 2016

Shared Preference Example in Android

In Android, There are many way to store data of an application. But if you want to store some small value then shared preferences is best way to store data of an application. It is allow to save and retrieve data from key and value.

Shared Preference is worked Key and Value. We can store string,integer, long, number etc. value

Let's see the example of Shared Preference :

File Name : MainActivity.java


 1
 2
 3
 4
 5
 6
 7
 8
 9
10
11
12
13
14
15
16
17
18
19
20
21
22
23
24
25
26
27
28
29
30
31
32
33
34
35
36
37
38
39
40
41
42
43
44
45
46
47
48
49
50
51
52
53
54
55
56
57
58
59
60
61
62
63
package com.example.sharedpreference;

import android.os.Bundle;
import android.app.Activity;
import android.view.Menu;
import android.content.Context;
import android.content.SharedPreferences;
import android.view.MenuItem;
import android.view.View;
import android.widget.Button;
import android.widget.EditText;
import android.widget.Toast;

public class MainActivity extends Activity {

 EditText e1,e2;
 Button b1;
 SharedPreferences shared;
 
 @Override
 protected void onCreate(Bundle savedInstanceState) {
  super.onCreate(savedInstanceState);
  setContentView(R.layout.activity_main);
  
  e1 = (EditText)findViewById(R.id.editText1);
  e2 = (EditText)findViewById(R.id.editText2);
  b1 = (Button)findViewById(R.id.button);
  shared = getSharedPreferences("MyPreference", Context.MODE_PRIVATE);
  
  String user = shared.getString("UserKey", "");//In first arguement set key which you store in variable and second argue is default value
  String pwd  = shared.getString("PassKey", "");
  
  e1.setText(user);//Here, if value is available in shared preference then value is display in edit text.
  e2.setText(pwd);
  
  b1.setOnClickListener(new View.OnClickListener() {
   
   @Override
   public void onClick(View arg0) {
    // TODO Auto-generated method stub
   
    String uname = e1.getText().toString();
    String pass = e2.getText().toString();
    
    //it is used to data by shared preference, SharedPreference.Editor class is used 
    SharedPreferences.Editor editor = shared.edit();
    editor.putString("UserKey", uname); // it is store key and value... UserKey is key and uname is value
    editor.putString("PassKey", pass);
    editor.commit();
    Toast.makeText(getApplicationContext(), "Record Saved in SharedPreference", Toast.LENGTH_SHORT).show();
   }
  });
  
 }

 @Override
 public boolean onCreateOptionsMenu(Menu menu) {
  // Inflate the menu; this adds items to the action bar if it is present.
  getMenuInflater().inflate(R.menu.activity_main, menu);
  return true;
 }

}

File Name : activity_main.xml


 1
 2
 3
 4
 5
 6
 7
 8
 9
10
11
12
13
14
15
16
17
18
19
20
21
22
23
24
25
26
27
28
29
30
31
32
33
34
35
36
37
38
39
<RelativeLayout xmlns:android="http://schemas.android.com/apk/res/android"
    xmlns:tools="http://schemas.android.com/tools"
    android:layout_width="match_parent"
    android:layout_height="match_parent"
    tools:context=".MainActivity" >

    <EditText
      android:layout_width="wrap_content"
      android:layout_height="wrap_content"
      android:id="@+id/editText1"
      android:layout_marginTop="67dp"
      android:hint="Enter User Name"
      android:layout_alignParentRight="true"
      android:layout_alignParentEnd="true"
      android:layout_alignParentLeft="true"
      android:layout_alignParentStart="true" />
    
    
    <EditText
      android:layout_width="wrap_content"
      android:layout_height="wrap_content"
      android:id="@+id/editText2"
      android:layout_below="@+id/editText1"
      android:layout_alignParentLeft="true"
      android:layout_alignParentStart="true"
      android:layout_alignParentRight="true"
      android:layout_alignParentEnd="true"
      android:hint="Enter Password" />

    <Button
        android:id="@+id/button"
        android:layout_width="wrap_content"
        android:layout_height="wrap_content"
        android:layout_below="@+id/editText2"
        android:layout_centerHorizontal="true"
        android:layout_marginTop="18dp"
        android:text="Save" />
    
</RelativeLayout>

  • After click on save button data saved in shared preference. To see the proper output, first close this application after save data in shared preference, then open application and you will see all the text you have written back in your application.
Output :

  • Before Data Save


  • After Data Save


Tuesday 11 October 2016

Copying and Pasting Text in an Edit Text Control in Android

In this example, We will learn that how to copy data from editText and paste data.

For copying and pasting different types of data , Android provides clipboard framework. In this example, we use ClipboardManager class which is used to allow you to copy and paste text via clipboard.

First of all that, You input some data in editText, then click on Copy Button to copy text from edit text. After for paste this copied , You click on Paste button. You will display copied text in text view after clicked on Paste Button.

Let's see the Example :


File Name : MainActivity.java


 1
 2
 3
 4
 5
 6
 7
 8
 9
10
11
12
13
14
15
16
17
18
19
20
21
22
23
24
25
26
27
28
29
30
31
32
33
34
35
36
37
38
39
40
41
42
43
44
45
46
47
48
49
50
51
52
53
54
55
56
57
58
59
60
61
62
63
64
65
66
67
68
69
70
71
72
73
74
75
76
77
78
79
package com.example.copypastedemo;

import android.os.Bundle;
import android.app.Activity;
import android.view.Menu;
import android.content.ClipData;
import android.content.ClipboardManager;
import android.view.View;
import android.widget.Button;
import android.widget.EditText;
import android.widget.TextView;
import android.widget.Toast;


public class MainActivity extends Activity {

 EditText ed1;
 TextView t1;
 Button b1,b2;
 private ClipboardManager myClipboard;
 private ClipData myClip;

    @Override
    protected void onCreate(Bundle savedInstanceState) {
        super.onCreate(savedInstanceState);
        setContentView(R.layout.activity_main);
        
        ed1=(EditText)findViewById(R.id.editText1);
        t1 = (TextView)findViewById(R.id.textView1);
        
        b1=(Button)findViewById(R.id.button1);
        b2=(Button)findViewById(R.id.button2);
                
        myClipboard = (ClipboardManager)getSystemService(CLIPBOARD_SERVICE);
        
        b1.setOnClickListener(new View.OnClickListener() {
   
   @Override
   public void onClick(View arg0) {
    // TODO Auto-generated method stub
   
    String text;
             text = ed1.getText().toString();
             myClip = ClipData.newPlainText("text", text);
             myClipboard.setPrimaryClip(myClip);
             
             Toast.makeText(getApplicationContext(), "Text Copied",Toast.LENGTH_SHORT).show();


   }
  });
        
        b2.setOnClickListener(new View.OnClickListener() {
   
   @Override
   public void onClick(View arg0) {
    // TODO Auto-generated method stub
   
    ClipData abc = myClipboard.getPrimaryClip();
             ClipData.Item item = abc.getItemAt(0);
             
             String text = item.getText().toString();
             t1.setText(text);
             
             Toast.makeText(getApplicationContext(), "Text Pasted",Toast.LENGTH_SHORT).show();

   }
  });
    }

    @Override
    public boolean onCreateOptionsMenu(Menu menu) {
        // Inflate the menu; this adds items to the action bar if it is present.
        getMenuInflater().inflate(R.menu.activity_main, menu);
        return true;
    }
    
}

File Name : activity_main.xml


 1
 2
 3
 4
 5
 6
 7
 8
 9
10
11
12
13
14
15
16
17
18
19
20
21
22
23
24
25
26
27
28
29
30
31
32
33
34
35
36
37
38
39
40
41
42
43
44
45
46
47
<RelativeLayout xmlns:android="http://schemas.android.com/apk/res/android"
    xmlns:tools="http://schemas.android.com/tools"
    android:layout_width="match_parent"
    android:layout_height="match_parent"
    tools:context=".MainActivity" >

    <EditText
        android:id="@+id/editText1"
        android:layout_width="wrap_content"
        android:layout_height="wrap_content"
        android:layout_alignParentLeft="true"
        android:layout_alignParentTop="true"
        android:layout_marginLeft="48dp"
        android:layout_marginTop="76dp"
        android:ems="10"
        android:hint="" >

        <requestFocus />
    </EditText>

    <Button
        android:id="@+id/button1"
        android:layout_width="wrap_content"
        android:layout_height="wrap_content"
        android:layout_alignLeft="@+id/editText1"
        android:layout_centerVertical="true"
        android:text="@string/b1" />

    <Button
        android:id="@+id/button2"
        android:layout_width="wrap_content"
        android:layout_height="wrap_content"
        android:layout_alignBaseline="@+id/button1"
        android:layout_alignBottom="@+id/button1"
        android:layout_centerHorizontal="true"
        android:text="@string/b2" />

    <TextView
        android:id="@+id/textView1"
        android:layout_width="wrap_content"
        android:layout_height="wrap_content"
        android:layout_alignLeft="@+id/editText1"
        android:layout_below="@+id/editText1"
        android:layout_marginTop="20dp"
        android:text="Paste Text Here" />

</RelativeLayout>

Output :

Copy and Paste Text in Edit Text in Android     Copy and Paste Text in Edit Text in Android2

Like us on Facebook

Site Visitor

Powered by Blogger.