Android Tutorial , Programming Tutorial, Php Tutorial, Learn Android, HTML Tutorial, Coding , Java Tutorial, GTU Programs, Learning Programming

Wednesday 21 September 2016

Custom ListView with images and text in Android

ListView is one type of View that enables to display items in list format. It displays a list of items in a vertical scroll list. It is a versatile control that we can customize.

So, Now we are going to learn about how to create custom listview. Each row in a particular listview using a separate layout.

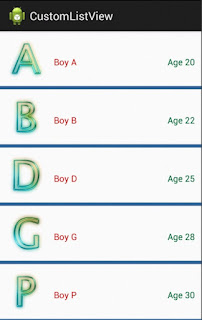
First of all, In this example , there are 3 colums used in custom listview example. First column display an images. Second column display name of the person and Third colums display age of the person. To use image example put images in res/drawable folder.

Let's See the Example :

File Name : MainActivity.java


 1
 2
 3
 4
 5
 6
 7
 8
 9
10
11
12
13
14
15
16
17
18
19
20
21
22
23
24
25
26
27
28
29
30
31
32
33
34
35
36
37
38
39
40
41
42
package com.example.customlistview;

import android.os.Bundle;
import android.app.Activity;
import android.view.Menu;
import android.widget.ListView;

public class MainActivity extends Activity {

 ListView listview;
 int[] image = {R.drawable.a,R.drawable.b,R.drawable.d,R.drawable.g,R.drawable.p};
 String[] name = {"Boy A","Boy B","Boy D","Boy G","Boy P"};
 String[] details = {"Age 20","Age 22","Age 25","Age 28","Age 30"};
 
 
 @Override
 protected void onCreate(Bundle savedInstanceState) {
  super.onCreate(savedInstanceState);
  setContentView(R.layout.activity_main);
  
  listview = (ListView)findViewById(R.id.ListView);
  NameAdapter adapater = new NameAdapter(getApplicationContext(), R.layout.row_layout);
  listview.setAdapter(adapater);
  int i = 0;
  for(String Name : name)
  {
   NameClass obj = new NameClass(image[i], Name, details[i]);
   adapater.add(obj);
   i++;
   
  }
  
 }

 @Override
 public boolean onCreateOptionsMenu(Menu menu) {
  // Inflate the menu; this adds items to the action bar if it is present.
  getMenuInflater().inflate(R.menu.activity_main, menu);
  return true;
 }

}


NameAdapter.java File is using for need of Handling ListView using ArrayAdapter. So, Create a new java file. To create a new java file follow steps : to right click on package->new->class-> write name of file and click Finish


File Name : NameAdapter.java


 1
 2
 3
 4
 5
 6
 7
 8
 9
10
11
12
13
14
15
16
17
18
19
20
21
22
23
24
25
26
27
28
29
30
31
32
33
34
35
36
37
38
39
40
41
42
43
44
45
46
47
48
49
50
51
52
53
54
55
56
57
58
59
60
61
62
63
64
65
66
67
68
69
70
71
72
73
74
75
76
77
78
79
package com.example.customlistview;

import java.util.ArrayList;
import java.util.List;

import android.content.Context;
import android.view.LayoutInflater;
import android.view.View;
import android.view.ViewGroup;
import android.widget.ArrayAdapter;
import android.widget.ImageView;
import android.widget.TextView;

public class NameAdapter extends ArrayAdapter {

 private List list = new ArrayList();
 
 
 public NameAdapter(Context context, int textViewResourceId) {
  super(context, textViewResourceId);
  // TODO Auto-generated constructor stub
 }
 
 public void add(NameClass object) {
  // TODO Auto-generated method stub
  list.add(object);
  super.add(object);
  
 }
 static class imgHolder
 {
  ImageView IMG;
  TextView NAME,DETAIL;
  
 }
 @Override
 public int getCount() {
  // TODO Auto-generated method stub
  
  return this.list.size();
 }
 
 @Override
 public Object getItem(int position) {
  // TODO Auto-generated method stub
  return this.list.get(position);
 }
 
 @Override
 public View getView(int position, View convertView, ViewGroup parent) {
  // TODO Auto-generated method stub
  
  View row;
  row = convertView;
  imgHolder holder;
  if(convertView==null)
  {
   
  
  LayoutInflater inflater = (LayoutInflater)this.getContext().getSystemService(Context.LAYOUT_INFLATER_SERVICE);
  row =  inflater.inflate(R.layout.row_layout, parent,false);
  holder = new imgHolder();
  holder.IMG = (ImageView) row.findViewById(R.id.image);
  holder.NAME = (TextView) row.findViewById(R.id.name);
  holder.DETAIL = (TextView)row.findViewById(R.id.detail);
  row.setTag(holder);
  }
  else
  {
   holder = (imgHolder) row.getTag();
   
  }
  NameClass n = (NameClass) getItem(position);
  holder.IMG.setImageResource(n.getName_resource());
  holder.NAME.setText(n.getPerson_name());
  holder.DETAIL.setText(n.getPerson_details());
  return row;
 }
}


we need an object that is capable of handling one row particular in listview. So we create a separate class.To create a new java file follow steps : to right click on package->new->class-> write name of file and click Finish

File Name : NameClass.java


 1
 2
 3
 4
 5
 6
 7
 8
 9
10
11
12
13
14
15
16
17
18
19
20
21
22
23
24
25
26
27
28
29
30
31
32
33
34
35
36
37
package com.example.customlistview;

public class NameClass {

 private int name_resource;
 private String person_name;
 private String person_details;


 public NameClass(int name_resource, String person_name,
   String person_details) {
  super();
  this.setName_resource(name_resource);
  this.setPerson_name(person_name);
  this.setPerson_details(person_details);
 }
 public int getName_resource() {
  return name_resource;
 }
 public void setName_resource(int name_resource) {
  this.name_resource = name_resource;
 }
 public String getPerson_name() {
  return person_name;
 }
 public void setPerson_name(String person_name) {
  this.person_name = person_name;
 }
 public String getPerson_details() {
  return person_details;
 }
 public void setPerson_details(String person_details) {
  this.person_details = person_details;
 }
}


To set Layout of ListView,activity_main.xml is used in this example

File Name : activity_main.xml


 1
 2
 3
 4
 5
 6
 7
 8
 9
10
11
12
13
14
15
16
17
18
<RelativeLayout xmlns:android="http://schemas.android.com/apk/res/android"
    xmlns:tools="http://schemas.android.com/tools"
    android:layout_width="fill_parent"
    android:layout_height="match_parent"
    android:orientation="vertical"
    tools:context=".MainActivity" >

    
<ListView 
    android:id="@+id/ListView"
    android:layout_width="match_parent"
    android:layout_height="match_parent"
    android:layout_marginBottom="0dp"
    android:layout_marginTop="0dp"
    android:dividerHeight="5dp"
    android:divider="#336699"></ListView>
    
</RelativeLayout>


To set separate layout for individual row on this listview, we have to create new xml file. Follow Step to create new xml file : To Right Click on layout -> new ->  Android XML File -> set name of File and the Click on Finish.

File Name : row_layout.xml


 1
 2
 3
 4
 5
 6
 7
 8
 9
10
11
12
13
14
15
16
17
18
19
20
21
22
23
24
25
26
27
28
29
30
31
32
33
34
35
36
37
38
39
40
41
42
43
<?xml version="1.0" encoding="utf-8"?>
<RelativeLayout xmlns:android="http://schemas.android.com/apk/res/android"
    android:layout_width="fill_parent"
    android:layout_height="fill_parent"
    android:layout_marginTop="0dp"
    android:layout_marginBottom="0dp"
    android:focusableInTouchMode="true"
     >
    
    <ImageView
        android:id="@+id/image"
        android:layout_height="wrap_content"
        android:layout_width="wrap_content"
        android:layout_centerVertical="true"
        android:paddingRight="10dp"
        android:paddingTop="10dp"
        android:paddingBottom="10dp"
  android:paddingLeft="10dp"
  android:scaleType="centerCrop"
        />

    <TextView
        android:id="@+id/name"
        android:layout_height="wrap_content"
        android:layout_width="wrap_content"
        android:layout_toRightOf="@+id/image"
        android:layout_centerVertical="true"
        android:paddingTop="10dp"
        android:textColor="#CC0000"
        />
    
    <TextView
        android:id="@+id/detail"
        android:layout_height="wrap_content"
        android:layout_width="wrap_content"
        android:layout_alignParentRight="true"
        android:layout_centerVertical="true"
        android:paddingTop="10dp"
  android:paddingRight="10dp"
  android:textColor="#006633"
  
        />
</RelativeLayout>


Output :

CustomListView

Tuesday 20 September 2016

Show and Hide Password on checkbox click in HTML with Javascript

In this example, I will explain how to Show and hide Password on checkbox click in HTML with javaScript. This Example also used website developed using php.

First of all, This feature allows user to check their password when they enter in textbox. On show password checkbox click , password will display in text format. If checkbox is unchecked then password will display in password type.

Now, show the code of this example which is given below. Let's see :

File Name : demo.html

 1
 2
 3
 4
 5
 6
 7
 8
 9
10
11
12
13
14
15
<html>
<head> </head>
<body>
Pasword : <input type="password" name="password" id="password" />

<br/>
<br />

<input type="checkbox" id="eye" onclick="if(password.type=='text')password.type='password'; else password.type='text';"/>Show Password


</body>


</html>


Output:


Sunday 18 September 2016

Insert , Update , Delete in mysql using php

In this example, CRUD operation (Insert,update,delete,view Record) is describe here. As we enter data in textbox , that data will be stored in the database which is created in mysql. We can update record. If record is available in the database table then we can update otherwise we can't update record. We can delete record by adding first name in this example. To make attractive look of form, in this example materialize css is used in the example .Let's see the example :

File Name :- insert.php

 1
 2
 3
 4
 5
 6
 7
 8
 9
10
11
12
13
14
15
16
17
18
19
20
21
22
23
24
25
26
27
28
29
30
31
32
33
34
35
36
37
38
39
40
41
42
43
44
45
46
47
48
49
50
51
52
53
54
55
56
57
58
59
60
61
<?php
 $servername= "localhost";
 $username = "root";
 $password="";
 $dbname="dbmultiple";
 
 $conn = new mysqli($servername,$username,$password,$dbname);
 if($conn->connect_error)
 {
  die("Connection Failed".$conn->connect_error);
 }
 if(isset($_POST['cancel']))
 {
  $fn = $_POST["fname"];
  $ln = $_POST["lname"];
  $fn="";
  $ln="";
 }
 if(isset($_POST['insert']))
 {
  $fn = $_POST["fname"];
  $ln = $_POST["lname"];  
  $sql = "INSERT INTO users(first_name,last_name) VALUES ('".$fn."','".$ln."')";
  if($conn->query($sql)===TRUE)
  {
   echo "Record Insert Successfully";
  }
  else
  {
   echo "Error :".$sql."<br>".$conn->error;
  }
 }
 $conn->close();
?>
<html>
<head>
<link rel="stylesheet" href="css/materialize.css"/>
<link rel="stylesheet" href="css/materialize.min.css"/>
</head>
<body>
<center>
<form method="POST" >
<div class="row">
 <div class="input-field col s6">
  
  <input type="text" name="fname" placeholder="Enter First Name" required><br/>
  <input type="text" name="lname" placeholder="Enter Last Name" required><br/>


 <input type="submit" name="insert" value="Insert" class="waves-effect waves-light btn">
 <input type="submit" name="cancel" value="Cancel" class="waves-effect waves-light btn">

</div>
</form>
</center>
<script type="text/javascript" src="js/materialize.js"/>
<script type="text/javascript" src="js/materialize.min.js"/>

</body>

</html>

Output :


File Name : update.php


 1
 2
 3
 4
 5
 6
 7
 8
 9
10
11
12
13
14
15
16
17
18
19
20
21
22
23
24
25
26
27
28
29
30
31
32
33
34
35
36
37
38
39
40
41
42
43
44
45
46
47
48
49
50
51
52
53
54
55
56
57
58
59
<?php
 $servername= "localhost";
 $username = "root";
 $password="";
 $dbname="dbmultiple";
 
 $conn = new mysqli($servername,$username,$password,$dbname);
 if($conn->connect_error)
 {
  die("Connection Failed".$conn->connect_error);
 }
 if(isset($_POST['cancel']))
 {
  $fn = $_POST["fname"];
  $ln = $_POST["lname"];
  $fn="";
  $ln="";
 }
 if(isset($_POST['update']))
 {
  $fn = $_POST["fname"];
  $ln = $_POST["lname"];  
  $sql = "UPDATE users SET last_name='$ln' WHERE first_name='$fn'";
  if($conn->query($sql)===TRUE)
  {
   echo "Record UPDATE Successfully";
  }
  else
  {
   echo "Error :".$sql."<br>".$conn->error;
  }
 }
 $conn->close();
?>
<html>
<head>
<link rel="stylesheet" href="css/materialize.css"/>
<link rel="stylesheet" href="css/materialize.min.css"/>
</head>
<body>
<center>
<form method="POST" >
<div class="row">
 <div class="input-field col s6">
  
  <input type="text" name="fname" placeholder="Enter First Name" required><br/>
  <input type="text" name="lname" placeholder="Enter Last Name" required><br/>


 <input type="submit" name="update" value="Update" class="waves-effect waves-light btn">
 <input type="submit" name="cancel" value="Cancel" class="waves-effect waves-light btn">

</div>
</form>
</center>
<script type="text/javascript" src="js/materialize.js"/>
<script type="text/javascript" src="js/materialize.min.js"/>
</body>
</html>
Output :


File Name : delete.php


 1
 2
 3
 4
 5
 6
 7
 8
 9
10
11
12
13
14
15
16
17
18
19
20
21
22
23
24
25
26
27
28
29
30
31
32
33
34
35
36
37
38
39
40
41
42
43
44
45
46
47
48
49
50
51
52
53
54
55
<?php
 $servername= "localhost";
 $username = "root";
 $password="";
 $dbname="dbmultiple";
 
 $conn = new mysqli($servername,$username,$password,$dbname);
 if($conn->connect_error)
 {
  die("Connection Failed".$conn->connect_error);
 }
 if(isset($_POST['cancel']))
 {
  $fn = $_POST["fname"];
  $ln = $_POST["lname"];
  $fn="";
  $ln="";
 }
 if(isset($_POST['delete']))
 {
  $fn = $_POST["fname"];
  $sql = "DELETE FROM users WHERE first_name='$fn'";
  if($conn->query($sql)===TRUE)
  {
   echo "Record DELETE Successfully";
  }
  else
  {
   echo "Error :".$sql."<br>".$conn->error;
  }
 }
 $conn->close();
?>
<html>
<head>
<link rel="stylesheet" href="css/materialize.css"/>
<link rel="stylesheet" href="css/materialize.min.css"/>
</head>
<body>
<center>
<form method="POST" >
<div class="row">
 <div class="input-field col s6">
  
 <input type="text" name="fname" placeholder="Enter First Name" required><br/>
 
 <input type="submit" name="delete" value="Delete" class="waves-effect waves-light btn">
 <input type="submit" name="cancel" value="Cancel" class="waves-effect waves-light btn">

</div>
</form>
</center>
<script type="text/javascript" src="js/materialize.js"/>
<script type="text/javascript" src="js/materialize.min.js"/>
</body>
Output :


Note :

Database Name : dbmultiple
Table Name : users
Field Name : first_name,last_name

CSS Download link : Click Here

Thursday 15 September 2016

Android Tutorial : SQLite Database Example

SQLite is an Open Source SQL Database which is used to store data and perform some task like insert, update, delete, search/read data or database operation.

android.database.sqlite package contain SQLite class.

SQLiteOpenHelper class is also provide functionality to use SQLite Database.

So, Now we will see the example of CRUD Operation with SQLite Database or Insert , Update , Delete, View Operation in easy way.

Let's see the example of Android SQLite Database Example :


File Name : MainActivity.java


  1
  2
  3
  4
  5
  6
  7
  8
  9
 10
 11
 12
 13
 14
 15
 16
 17
 18
 19
 20
 21
 22
 23
 24
 25
 26
 27
 28
 29
 30
 31
 32
 33
 34
 35
 36
 37
 38
 39
 40
 41
 42
 43
 44
 45
 46
 47
 48
 49
 50
 51
 52
 53
 54
 55
 56
 57
 58
 59
 60
 61
 62
 63
 64
 65
 66
 67
 68
 69
 70
 71
 72
 73
 74
 75
 76
 77
 78
 79
 80
 81
 82
 83
 84
 85
 86
 87
 88
 89
 90
 91
 92
 93
 94
 95
 96
 97
 98
 99
100
101
102
103
104
105
106
107
108
109
110
111
112
113
114
115
116
117
118
119
120
121
122
123
124
125
126
127
128
129
130
131
132
133
134
135
136
137
138
139
140
141
142
143
144
145
146
147
148
149
150
151
152
153
154
155
156
157
158
159
160
161
package com.example.sqlitedemo;

import android.os.Bundle;
import android.app.Activity;
import android.database.sqlite.SQLiteDatabase;
import android.view.Menu;
import android.view.View;
import android.widget.Button;
import android.widget.EditText;
import android.app.AlertDialog.Builder;
import android.content.Context;
import android.database.Cursor;
import android.database.sqlite.SQLiteDatabase;
import android.view.View.OnClickListener;

public class MainActivity extends Activity implements OnClickListener {

  EditText editId,editName,editSalary;
 Button btnAdd,btnDelete,btnModify,btnView,btnViewAll,btnShowInfo;
 SQLiteDatabase db;

  
 @Override
 protected void onCreate(Bundle savedInstanceState) {
  super.onCreate(savedInstanceState);
  setContentView(R.layout.activity_main);
  
 editId=(EditText)findViewById(R.id.editId);
        editName=(EditText)findViewById(R.id.editName);
        editSalary=(EditText)findViewById(R.id.editSalary);
        btnAdd=(Button)findViewById(R.id.btnAdd);
        btnDelete=(Button)findViewById(R.id.btnDelete);
        btnModify=(Button)findViewById(R.id.btnModify);
        btnView=(Button)findViewById(R.id.btnView);
        btnViewAll=(Button)findViewById(R.id.btnViewAll);
        btnAdd.setOnClickListener(this);
        btnDelete.setOnClickListener(this);
        btnModify.setOnClickListener(this);
        btnView.setOnClickListener(this);
        btnViewAll.setOnClickListener(this);
        db=openOrCreateDatabase("EmployeeDB", Context.MODE_PRIVATE, null);
  db.execSQL("CREATE TABLE IF NOT EXISTS employee(id VARCHAR,name VARCHAR,salary VARCHAR);");
 }
 
 
 public void onClick(View view)
    {
     if(view==btnAdd)
     {
      if(editId.getText().toString().trim().length()==0||
         editName.getText().toString().trim().length()==0||
         editSalary.getText().toString().trim().length()==0)
      {
       showMessage("Error", "Please enter all values");
       return;
      }
      db.execSQL("INSERT INTO employee VALUES('"+editId.getText()+"','"+editName.getText()+
           "','"+editSalary.getText()+"');");
      showMessage("Success", "Record added");
      clearText();
     }
     if(view==btnDelete)
     {
      if(editId.getText().toString().trim().length()==0)
      {
       showMessage("Error", "Please enter Id");
       return;
      }
      Cursor c=db.rawQuery("SELECT * FROM employee WHERE id='"+editId.getText()+"'", null);
      if(c.moveToFirst())
      {
       db.execSQL("DELETE FROM employee WHERE id='"+editId.getText()+"'");
       showMessage("Success", "Record Deleted");
      }
      else
      {
       showMessage("Error", "Invalid Id");
      }
      clearText();
     }
     if(view==btnModify)
     {
      if(editId.getText().toString().trim().length()==0)
      {
       showMessage("Error", "Please enter Id");
       return;
      }
      Cursor c=db.rawQuery("SELECT * FROM employee WHERE id='"+editId.getText()+"'", null);
      if(c.moveToFirst())
      {
       db.execSQL("UPDATE employee SET name='"+editName.getText()+"',salary='"+editSalary.getText()+
         "' WHERE id='"+editId.getText()+"'");
       showMessage("Success", "Record Modified");
      }
      else
      {
       showMessage("Error", "Invalid Id");
      }
      clearText();
     }
     if(view==btnView)
     {
      if(editId.getText().toString().trim().length()==0)
      {
       showMessage("Error", "Please enter Id");
       return;
      }
      Cursor c=db.rawQuery("SELECT * FROM employee WHERE id='"+editId.getText()+"'", null);
      if(c.moveToFirst())
      {
       editName.setText(c.getString(1));
       editSalary.setText(c.getString(2));
      }
      else
      {
       showMessage("Error", "Invalid Id");
       clearText();
      }
     }
     if(view==btnViewAll)
     {
      Cursor c=db.rawQuery("SELECT * FROM employee", null);
      if(c.getCount()==0)
      {
       showMessage("Error", "No records found");
       return;
      }
      StringBuffer buffer=new StringBuffer();
      while(c.moveToNext())
      {
       buffer.append("Id: "+c.getString(0)+"\n");
       buffer.append("Name: "+c.getString(1)+"\n");
       buffer.append("Salary: "+c.getString(2)+"\n\n");
      }
      showMessage("Employee Details", buffer.toString());
     }
    }
 public void showMessage(String title,String message)
    {
     Builder builder=new Builder(this);
     builder.setCancelable(true);
     builder.setTitle(title);
     builder.setMessage(message);
     builder.show();
 }
    public void clearText()
    {
     editId.setText("");
     editName.setText("");
     editSalary.setText("");
     editId.requestFocus();
    }

  @Override
 public boolean onCreateOptionsMenu(Menu menu) {
  // Inflate the menu; this adds items to the action bar if it is present.
  getMenuInflater().inflate(R.menu.activity_main, menu);
  return true;
 }

}


File Name : activity_main.xml


 1
 2
 3
 4
 5
 6
 7
 8
 9
10
11
12
13
14
15
16
17
18
19
20
21
22
23
24
25
26
27
28
29
30
31
32
33
34
35
36
37
38
39
40
41
42
43
44
45
46
47
48
49
50
51
52
53
54
55
56
57
58
59
60
61
62
63
64
65
66
67
68
69
70
71
72
73
74
75
<?xml version="1.0" encoding="utf-8"?>
<AbsoluteLayout xmlns:android="http://schemas.android.com/apk/res/android"
             android:id="@+id/myLayout"
             android:stretchColumns="0"
             android:layout_width="fill_parent"
             android:layout_height="fill_parent">
  <TextView android:text="@string/title"
      android:layout_x="110dp"
      android:layout_y="10dp"
            android:layout_width="wrap_content"
            android:layout_height="wrap_content"/>
  <TextView android:text="@string/id"
      android:layout_x="30dp"
      android:layout_y="50dp"
            android:layout_width="wrap_content"
            android:layout_height="wrap_content"/>
  <EditText android:id="@+id/editId"
      android:inputType="number" 
      android:layout_x="150dp"
      android:layout_y="50dp"
            android:layout_width="150dp"
            android:layout_height="40dp"/>
  <TextView android:text="@string/name"
      android:layout_x="30dp"
      android:layout_y="100dp"
            android:layout_width="wrap_content"
            android:layout_height="wrap_content"/>
  <EditText android:id="@+id/editName" 
      android:inputType="text" 
      android:layout_x="150dp"
      android:layout_y="100dp"
            android:layout_width="150dp"
            android:layout_height="40dp"/>
  <TextView android:text="@string/salary"
      android:layout_x="30dp"
      android:layout_y="150dp"
            android:layout_width="wrap_content"
            android:layout_height="wrap_content"/>
  <EditText android:id="@+id/editSalary" 
      android:inputType="number" 
      android:layout_x="150dp"
      android:layout_y="150dp"
            android:layout_width="150dp"
            android:layout_height="40dp"/>
  <Button   android:id="@+id/btnAdd"
      android:text="@string/add"
      android:layout_x="30dp"
      android:layout_y="200dp"
            android:layout_width="100dp"
            android:layout_height="40dp"/>
  <Button   android:id="@+id/btnDelete"
      android:text="@string/delete"
      android:layout_x="150dp"
      android:layout_y="200dp"
            android:layout_width="100dp"
            android:layout_height="40dp"/>n
  <Button   android:id="@+id/btnModify"
      android:text="@string/modify"
      android:layout_x="30dp"
      android:layout_y="250dp"
            android:layout_width="100dp"
            android:layout_height="40dp"/>
  <Button   android:id="@+id/btnView"
      android:text="@string/view"
      android:layout_x="150dp"
      android:layout_y="250dp"
            android:layout_width="100dp"
            android:layout_height="40dp"/>
  <Button   android:id="@+id/btnViewAll"
      android:text="@string/view_all"
      android:layout_x="30dp"
      android:layout_y="300dp"
            android:layout_width="220dp"
            android:layout_height="40dp"/>
</AbsoluteLayout>


File Name : strings.xml


 1
 2
 3
 4
 5
 6
 7
 8
 9
10
11
12
13
14
15
16
17
18
19
<?xml version="1.0" encoding="utf-8"?>
<resources>

    <string name="app_name">SQLiteDemo</string>
    <string name="hello_world">Hello world!</string>
    <string name="menu_settings">Settings</string>

   
    <string name="title">Employee Details</string>
    <string name="id">Enter ID: </string>
    <string name="name">Enter Name: </string>
    <string name="salary">Enter Salary: </string>
    <string name="add">Add</string>
    <string name="delete">Delete</string>
    <string name="modify">Modify</string>
    <string name="view">View</string>
    <string name="view_all">View All</string>
    <string name="show_info">Show Information</string>
</resources>


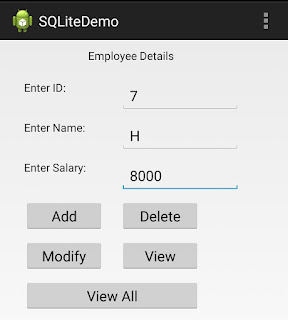
Output:


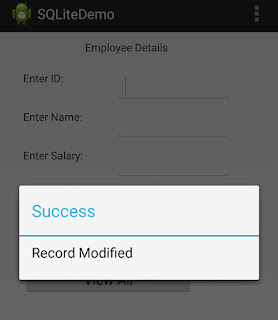
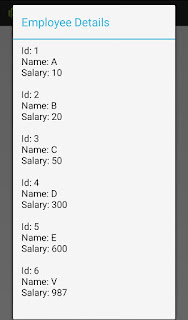
SQLite Example
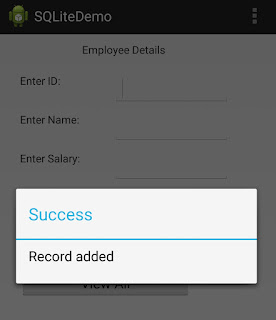
 Insert Record Using SQLite
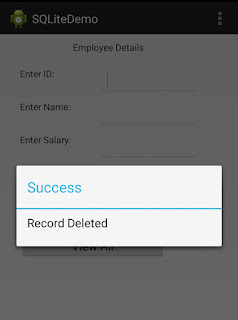
Delete Record Using SQLite
Update Record USing SQLite
All Record View


Like us on Facebook

Site Visitor

Powered by Blogger.