Android Tutorial , Programming Tutorial, Php Tutorial, Learn Android, HTML Tutorial, Coding , Java Tutorial, GTU Programs, Learning Programming

Monday 30 January 2017

How to make rounded image with CSS

In this tutorial , we will learn that how to make rounded image using CSS.

This example is done by using border-radius property. In CSS, border-radius property is used to draw round corner of the element. This method is currently supported in mostly all browsers.

border-radius property will 50% then border of an element will shaped in circle.


1
2
3
4
.circular-img
{
 border-radius:50%;
}

To make an image round, simply use the below code :

File : index.html

 1
 2
 3
 4
 5
 6
 7
 8
 9
10
11
12
13
14
15
16
17
18
19
20
21
22
23
24
25
26
<html>
 <head>
  <style>
    .circular-img
    {
     display:inline-block;
     padding:10px;
     border-radius:50%;
     background:black;
     height:120px;
     width:120px;
    }
    .circular-img img
    {
     display:inline-block;
     margin-top:5px;
     margin-left:10px
    }
  </style>
 </head>
 <body>
  <div class="circular-img">
            <img src="img/06.png">
  </div>
 </body>
</html>


Output :


Click Here for View Demo :
Live Demo

Saturday 21 January 2017

How to create rounded social media icon button using CSS

In this tutorial , we will see that how to create rounded social media icon using CSS.

We all know that how much important of social media signs on your website . People are aware about your social website's social media profile and connected with you. Here i will show you that how to create rounded social media icon in very easy way. In this example , There are two CSS file used, style and font-awesome. Font Awesome is best icon font file for website.

There are some steps follow to make rounded social media icons.

1. create css style
2. use font-awesome css to draw rounded social media icons.
3. use anchor tag <a> to give link of the social media.
4. place <link> tag to add css reference.

Now let's see the example :

File Name : index.html
 1
 2
 3
 4
 5
 6
 7
 8
 9
10
11
12
13
14
15
16
17
18
19
20
21
22
<!DOCTYPE html>
<html >
<head>
  <meta charset="UTF-8">
  <title>CSS Social Media Icons</title>
  <link rel="stylesheet" href="css/style.css">
</head>

<body>
 <div id="social">
   <a class="facebookBtn smGlobalBtn" href="#" ></a>
   <a class="twitterBtn smGlobalBtn" href="#" ></a>
   <a class="linkedinBtn smGlobalBtn" href="#" ></a>
   <a class="googleplusBtn smGlobalBtn" href="#" ></a>
   <a class="tumblrBtn smGlobalBtn" href="#" ></a>
   <a class="rssBtn smGlobalBtn" href="#" ></a>
   <a class="pinterestBtn smGlobalBtn" href="#" ></a>
 </div>
  
  
</body>
</html>

File Name : style.css
  1
  2
  3
  4
  5
  6
  7
  8
  9
 10
 11
 12
 13
 14
 15
 16
 17
 18
 19
 20
 21
 22
 23
 24
 25
 26
 27
 28
 29
 30
 31
 32
 33
 34
 35
 36
 37
 38
 39
 40
 41
 42
 43
 44
 45
 46
 47
 48
 49
 50
 51
 52
 53
 54
 55
 56
 57
 58
 59
 60
 61
 62
 63
 64
 65
 66
 67
 68
 69
 70
 71
 72
 73
 74
 75
 76
 77
 78
 79
 80
 81
 82
 83
 84
 85
 86
 87
 88
 89
 90
 91
 92
 93
 94
 95
 96
 97
 98
 99
100
101
102
103
104
105
106
107
108
109
110
111
112
113
114
115
116
117
118
119
120
121
122
123
124
125
126
127
128
129
130
@import url('//maxcdn.bootstrapcdn.com/font-awesome/4.3.0/css/font-awesome.min.css');

#social {
  margin: 20px 10px;
  text-align: center;
}

.smGlobalBtn{ /* global button class */
    display: inline-block;
    position: relative;
    cursor: pointer;
    width: 50px;
    height: 50px;
    box-shadow: 0 2px 2px #999;
    padding: 0px;
    text-decoration: none;
    text-align: center;
    color: #fff;
    font-size: 25px;
    font-weight: normal;
    line-height: 2em;
    border-radius: 25px;
    -moz-border-radius:25px;
    -webkit-border-radius:25px;
}

/* facebook button class*/
.facebookBtn{
    background: #4060A5;
}

.facebookBtn:before{ /* use :before to add the relevant icons */
    font-family: "FontAwesome";
    content: "\f09a"; /* add facebook icon */
}

.facebookBtn:hover{
    color: #4060A5;
    background: #fff;
}

/* twitter button class*/
.twitterBtn{
    background: #00ABE3;
}

.twitterBtn:before{
      font-family: "FontAwesome";
      content: "\f099"; /* add twitter icon */
}

.twitterBtn:hover{
      color: #00ABE3;
      background: #fff;
}

/* google plus button class*/
.googleplusBtn{
    background: #e64522;
}

.googleplusBtn:before{
      font-family: "FontAwesome";
      content: "\f0d5"; /* add googleplus icon */
}

.googleplusBtn:hover{
      color: #e64522;
      background: #fff;
}

/* linkedin button class*/
.linkedinBtn{
    background: #0094BC;
}

.linkedinBtn:before{
      font-family: "FontAwesome";
      content: "\f0e1"; /* add linkedin icon */
}

.linkedinBtn:hover{
      color: #0094BC;
      background: #fff;
}

/* pinterest button class*/
.pinterestBtn{
    background: #cb2027;
}

.pinterestBtn:before{
      font-family: "FontAwesome";
      content: "\f0d2"; /* add pinterest icon */
}

.pinterestBtn:hover{
      color: #cb2027;
      background: #fff;
}

/* tumblr button class*/
.tumblrBtn{
    background: #3a5876;
}

.tumblrBtn:before{
      font-family: "FontAwesome";
      content: "\f173"; /* add tumblr icon */
}

.tumblrBtn:hover{
      color: #3a5876;
      background: #fff;
}

/* rss button class*/
.rssBtn{
    background: #e88845;
}

.rssBtn:before{
      font-family: "FontAwesome";
      content: "\f09e"; /* add rss icon */
}

.rssBtn:hover{
      color: #e88845;
      background: #fff;
}

Output :

social media icon


Click Here for View Demo :

Live Demo

Saturday 14 January 2017

Slowly display div using JQuery

In this tutorial , we are learning that how to slowly display div using jQuery.

In JQuery , There are fadeIn() method is used to display div with slow effect.

Syntax : 


1
2
3
$(selector).fadein();  
$(selector).fadeIn(speed,callback);   
$(selector).fadeIn(speed, easing, callback);

  • speed : It is used to speed  of the delay in slow , fast and miliseconds.
  • easing : It is used for transition.
  • callback : It is called after fadeIn() effect.
Let's see the example :


 1
 2
 3
 4
 5
 6
 7
 8
 9
10
11
12
13
14
15
16
17
18
19
20
21
22
<!DOCTYPE html>  
<html>  
<head>  
<script src="http://ajax.googleapis.com/ajax/libs/jquery/1.11.2/jquery.min.js"></script>  
<script>  
$(document).ready(function(){  
    $("button").click(function(){  
        $("#div1").fadeIn(1000);  
        $("#div2").fadeIn(5000);  
        $("#div3").fadeIn(8000);  
    });  
});  
</script>  
</head>  
<body>  
<h1>Desire Code : FadeIn() JQuery Effect</h1>  
<button>Click Here</button><br><br>  
<div id="div1" style="width:100px;height:80px;display:none;background-color:red;"></div><br/>
<div id="div2" style="width:100px;height:80px;display:none;background-color:green;"></div><br/>
<div id="div3" style="width:100px;height:80px;display:none;background-color:blue;"></div> 
</body>  
</html>


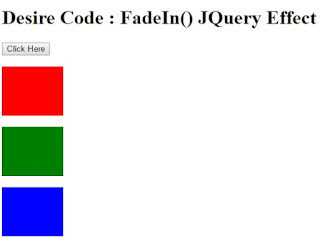
Output :

fadeIn

Monday 9 January 2017

File Upload and View with PHP and MySQL

In this tutorial, We are learning that how to upload any type of file and view using PHP and MySQL.

First of all, This tutorial demonstrates that how we can upload any type of file and store in database. After uploading, we can view that file which we upload.

You can upload file like jpeg, png, gif, pdf, doc, xls, etc.

So, now let's take a look and follow the steps :

Step 1 : create database and table.

Database name -> dbtuts
Table Name -> tbl_uploads
Field Name -> file (varchar) , type (varchar), size(varchar).

Step  2 : Create a new file for database configuration.

file name : dbconfig.php


1
2
3
4
5
6
7
8
<?php
$dbhost = "localhost";
$dbuser = "root";
$dbpass = "";
$dbname = "dbtuts";
mysql_connect($dbhost,$dbuser,$dbpass) or die('cannot connect to the server'); 
mysql_select_db($dbname) or die('database selection problem');
?>

Step 3 : Now , create a new file for file upload.

file name : index.php

 1
 2
 3
 4
 5
 6
 7
 8
 9
10
11
12
13
14
15
16
17
18
19
20
21
22
23
24
25
26
27
28
29
30
31
32
33
34
35
36
37
38
39
40
41
42
<?php
include_once 'dbconfig.php';
?>
<!DOCTYPE html>
<html>
<head>
<title>File Uploading With PHP and MySql</title>
<link rel="stylesheet" href="style.css" type="text/css" />
</head>
<body>
<div style="width:100%;background-color:black;color:white;">
<label><h2>File Upload With PHP and MySql</h2></label>
</div>
<div id="body">
 <form action="upload.php" method="post" enctype="multipart/form-data">
 <input type="file" name="file" />
 <button type="submit" name="btn-upload">upload</button>
 </form>
    <br /><br />
    <?php
 if(isset($_GET['success']))
 {
  ?>
        <label>File Uploaded Successfully........<a href="view.php">click here to show the file.</a></label>
        <?php
 }
 else if(isset($_GET['fail']))
 {
  ?>
        <label>Problem While File Uploading !</label>
        <?php
 }
 else
 {
  ?>
        <label>Try to upload any files (pdf,doc,xls,jpeg,png,gif,etc...)</label>
        <?php
 }
 ?>
</div>
</body>
</html>

Step 4 : Now, write the code of uploading file in database.

file name : upload.php


 1
 2
 3
 4
 5
 6
 7
 8
 9
10
11
12
13
14
15
16
17
18
19
20
21
22
23
24
25
26
27
28
29
30
31
32
33
34
35
36
<?php
include_once 'dbconfig.php';
if(isset($_POST['btn-upload']))
{         
 $file = rand(1000,100000)."-".$_FILES['file']['name'];
    $file_loc = $_FILES['file']['tmp_name'];
 $file_size = $_FILES['file']['size'];
 $file_type = $_FILES['file']['type'];
 $folder="uploads/";
 // new file size in KB
 $new_size = $file_size/1024;  
 // make file name in lower case
 $new_file_name = strtolower($file);
 $final_file=str_replace(' ','-',$new_file_name);
 if(move_uploaded_file($file_loc,$folder.$final_file))
 {
  $sql="INSERT INTO tbl_uploads(file,type,size) VALUES('$final_file','$file_type','$new_size')";
  mysql_query($sql);
  ?>
  <script>
   alert('successfully uploaded');
   window.location.href='index.php?success';
  </script>
  <?php
 }
 else
 {
  ?>
  <script>
   alert('error while uploading file');
   window.location.href='index.php?fail';
  </script>
  <?php
 }
}
?>

Step 5 : Now , write the code of view the file from database.

file name : view.php


 1
 2
 3
 4
 5
 6
 7
 8
 9
10
11
12
13
14
15
16
17
18
19
20
21
22
23
24
25
26
27
28
29
30
31
32
33
34
35
36
37
38
39
40
41
42
43
<?php
include_once 'dbconfig.php';
?>
<!DOCTYPE html>
<html>
<head>
<title>File Upload With PHP and MySql</title>
<link rel="stylesheet" href="style.css" type="text/css" />
</head>
<body>
<div style="width:100%;background-color:black;color:white;">
<label><h2>File Upload With PHP and MySql</h2></label>
</div>
<div id="body">
 <table width="70%" border="1">
    <tr>
    <th colspan="4"><label><a href="index.php">upload new files...</a></label></th>
    </tr>
    <tr>
    <td>File Name</td>
    <td>File Type</td>
    <td>File Size(KB)</td>
    <td>View</td>
    </tr>
    <?php
 $sql="SELECT * FROM tbl_uploads";
 $result_set=mysql_query($sql);
 while($row=mysql_fetch_array($result_set))
 {
  ?>
        <tr>
        <td><?php echo $row['file'] ?></td>
        <td><?php echo $row['type'] ?></td>
        <td><?php echo $row['size'] ?></td>
        <td><a href="uploads/<?php echo $row['file'] ?>" target="_blank">view file</a></td>
        </tr>
        <?php
 }
 ?>
    </table>    
</div>
</body>
</html>

There is one css file also include.

file name : style.css


 1
 2
 3
 4
 5
 6
 7
 8
 9
10
11
12
13
14
15
16
17
18
19
20
21
22
23
24
25
26
27
28
29
30
31
32
33
34
35
36
37
38
39
@charset "utf-8";
/* CSS Document */

*
{
 padding:0;
 margin:0;
}
body
{
 background:#fff;
 font-family:Georgia, "Gill Sans MT", Times, serif;
 text-align:center;
}
#body
{
 margin-top:100px;
}
#body table
{
 margin:0 auto;
 position:relative;
 bottom:50px;
}
table td,th
{
 padding:20px;
 border: solid #9fa8b0 1px;
 border-collapse:collapse;
}
#footer
{
 text-align:center;
 position:absolute;
 left:0;
 right:0;
 margin:0 auto;
 bottom:50px;
}

Output :


Thursday 5 January 2017

How to create circular flashing colors progress bar using materialize CSS

In this tutorial, we are learning that how to create circular flashing color progress bar using materialize css.

This progress bar is used to when your web page content will take long time to load. If progress bar will be put on the web page , then user can understand that this page will take long time for load.


There are many css class used to display circular flashing color progress bar. These all class included in materialize css file.

Let's see the example :

File Name : index.html

 1
 2
 3
 4
 5
 6
 7
 8
 9
10
11
12
13
14
15
16
17
18
19
20
21
22
23
24
25
26
27
28
29
30
31
32
33
34
35
36
37
38
39
40
41
42
43
44
45
46
47
<html>
 <head>
  <link rel="stylesheet" href="css/materialize.css" type="text/css"/>
  <script src="js/materialize.js" type="text/javascript" />
 </head>
    <div class="preloader-wrapper big active">
      <div class="spinner-layer spinner-blue">
        <div class="circle-clipper left">
          <div class="circle"></div>
        </div><div class="gap-patch">
          <div class="circle"></div>
        </div><div class="circle-clipper right">
          <div class="circle"></div>
        </div>
      </div>

      <div class="spinner-layer spinner-red">
        <div class="circle-clipper left">
          <div class="circle"></div>
        </div><div class="gap-patch">
          <div class="circle"></div>
        </div><div class="circle-clipper right">
          <div class="circle"></div>
        </div>
      </div>

      <div class="spinner-layer spinner-yellow">
        <div class="circle-clipper left">
          <div class="circle"></div>
        </div><div class="gap-patch">
          <div class="circle"></div>
        </div><div class="circle-clipper right">
          <div class="circle"></div>
        </div>
      </div>

      <div class="spinner-layer spinner-green">
        <div class="circle-clipper left">
          <div class="circle"></div>
        </div><div class="gap-patch">
          <div class="circle"></div>
        </div><div class="circle-clipper right">
          <div class="circle"></div>
        </div>
      </div>
    </div>
</html>

Output :


Like us on Facebook

Site Visitor

Powered by Blogger.