Android Tutorial , Programming Tutorial, Php Tutorial, Learn Android, HTML Tutorial, Coding , Java Tutorial, GTU Programs, Learning Programming

Monday 28 November 2016

Add Search Functionality in ListView in Android

In this example , Today we are learning that how to add search functionality in ListView.

Implement Search Functionality in ListView will filters the list data with a matching string, So it will be easy for user to search any data very quickly from large data ListView.

Now We are discussing about how to implement search functionality in ListView

First of all, Create a new project from menu.For listview , we are using default xml file activity_main.xml and  for Single list item create a new xml file named list_item.xml.

File Name : activity_main.xml


 1
 2
 3
 4
 5
 6
 7
 8
 9
10
11
12
13
14
15
16
17
18
<?xml version="1.0" encoding="utf-8"?>
<LinearLayout xmlns:android="http://schemas.android.com/apk/res/android"
    android:layout_width="fill_parent"
    android:layout_height="fill_parent"
    android:orientation="vertical" >
     
    <EditText android:id="@+id/search"
        android:layout_width="fill_parent"
        android:layout_height="wrap_content"
        android:hint="Search product"
      />
    
    <ListView
        android:id="@+id/list_view"
        android:layout_width="fill_parent"
        android:layout_height="wrap_content" />
  
</LinearLayout>

File Name : list_item.xml


 1
 2
 3
 4
 5
 6
 7
 8
 9
10
11
12
13
14
15
<?xml version="1.0" encoding="utf-8"?>
<LinearLayout xmlns:android="http://schemas.android.com/apk/res/android"
    android:layout_width="match_parent"
    android:layout_height="match_parent"
    android:orientation="vertical" >
     
    <!-- List Item Of Product -->
    <TextView android:id="@+id/product_name"
        android:layout_width="fill_parent"
        android:layout_height="wrap_content"
        android:padding="10dip"
        android:textSize="16dip"
        android:textStyle="bold"/>    
 
</LinearLayout>


Now, Open Your MainActivity.java file and copy the following code and paste in your file.

File Name : MainActivity.java


 1
 2
 3
 4
 5
 6
 7
 8
 9
10
11
12
13
14
15
16
17
18
19
20
21
22
23
24
25
26
27
28
29
30
31
32
33
34
35
36
37
38
39
40
41
42
43
44
45
46
47
48
49
50
51
52
53
54
55
56
57
58
59
60
61
62
63
64
65
package com.example.addsearchlistview;

import java.util.ArrayList;
import java.util.HashMap;
 
import android.app.Activity;
import android.os.Bundle;
import android.text.Editable;
import android.text.TextWatcher;
import android.view.Menu;
import android.widget.ArrayAdapter;
import android.widget.EditText;
import android.widget.ListView;


public class MainActivity extends Activity {

    ListView lv;
    ArrayAdapter<String> adapter;
    EditText search;
    ArrayList<HashMap<String, String>> productList; //ArrayList for Listview


 @Override
 protected void onCreate(Bundle savedInstanceState) {
  super.onCreate(savedInstanceState);
  setContentView(R.layout.activity_main);

 
   //Item of ListView
        String products[] = {"Lenovo", "Moto", "HTC", "iPhone", "Blackberry",
                                "Samsung", "OnePlus",
                                "LeEco", "Honor", "Micromax", "Xolo"};
         
        lv = (ListView) findViewById(R.id.list_view);
        search = (EditText) findViewById(R.id.search);
 
        //Add Item in ListView
        adapter = new ArrayAdapter<String>(this, R.layout.list_item, R.id.product_name, products);
        lv.setAdapter(adapter);
         
        // To Enabling Search Functionality
        search.addTextChangedListener(new TextWatcher() {
            
            @Override
            public void onTextChanged(CharSequence cs, int arg1, int arg2, int arg3) {
                // When user changed the Text
                MainActivity.this.adapter.getFilter().filter(cs);   
            }
             
            @Override
            public void beforeTextChanged(CharSequence arg0, int arg1, int arg2,
                    int arg3) {
                // TODO Auto-generated method stub
                 
            }
             
            @Override
            public void afterTextChanged(Editable arg0) {
                // TODO Auto-generated method stub                          
            }
        });
 }
}


At the end , add the following property in your AndroidManifest.xml file
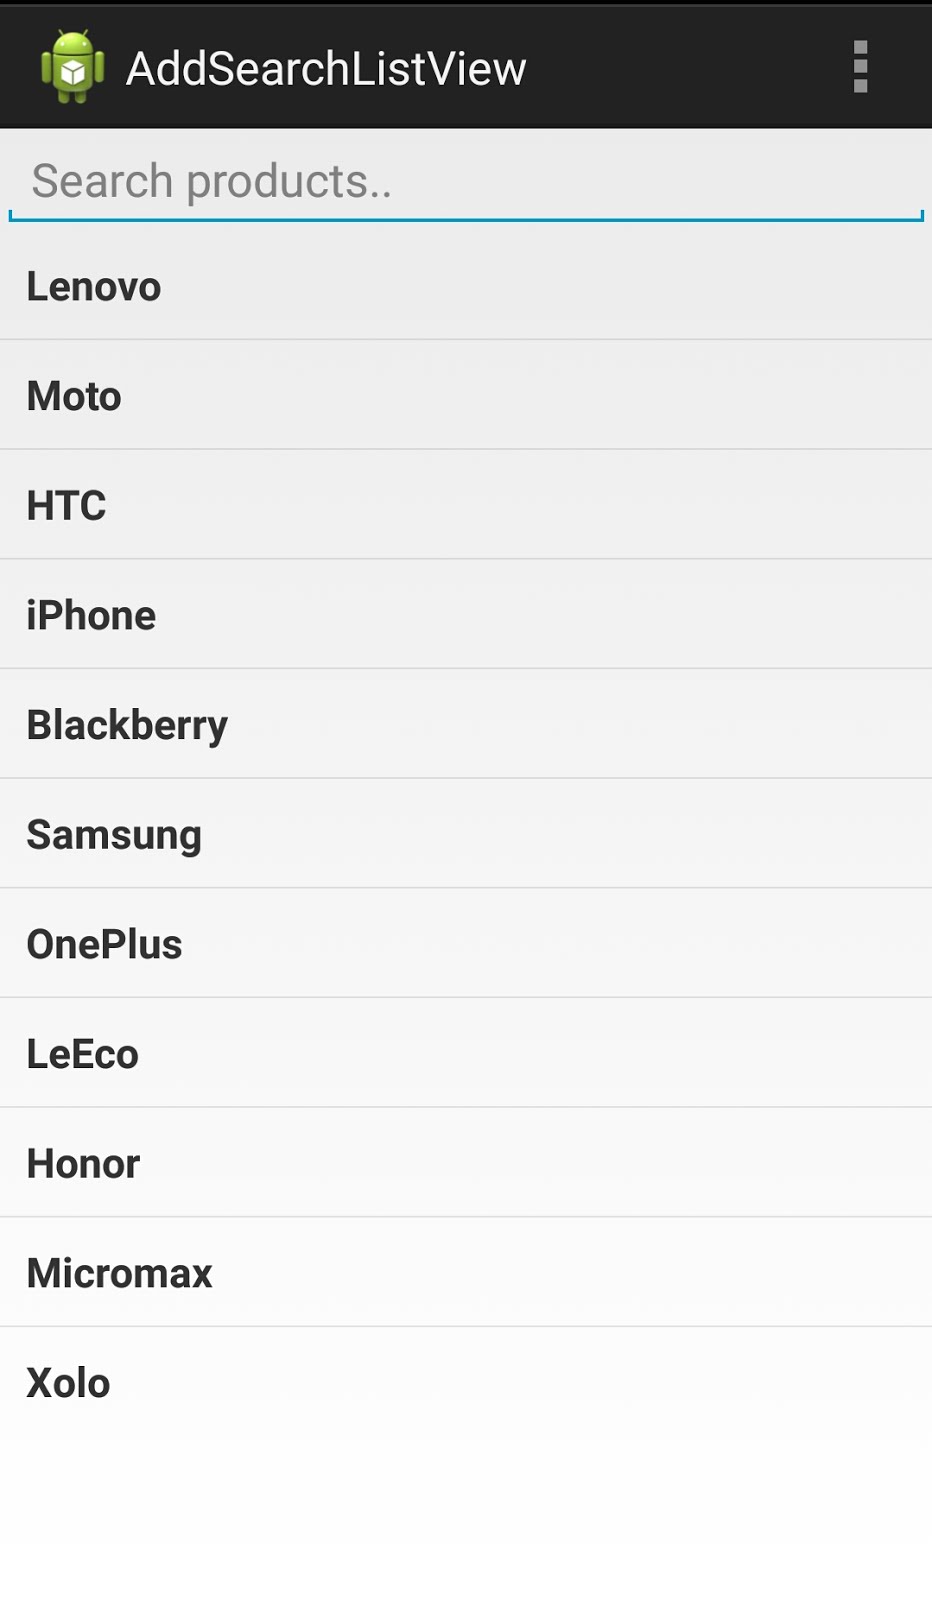
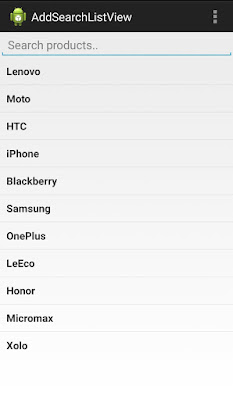


 1
 2
 3
 4
 5
 6
 7
 8
 9
10
11
12
13
14
15
16
17
18
19
20
21
22
23
24
25
26
27
28
<?xml version="1.0" encoding="utf-8"?>
<manifest xmlns:android="http://schemas.android.com/apk/res/android"
    package="com.example.addsearchlistview"
    android:versionCode="1"
    android:versionName="1.0" >

    <uses-sdk
        android:minSdkVersion="8"
        android:targetSdkVersion="17" />

    <application
        android:allowBackup="true"
        android:icon="@drawable/ic_launcher"
        android:label="@string/app_name"
        android:theme="@style/AppTheme" >
        <activity
            android:name="com.example.addsearchlistview.MainActivity"
            android:label="@string/app_name"
            android:windowSoftInputMode="stateHidden" > // To hide keyboard on loading activity
            <intent-filter>
                <action android:name="android.intent.action.MAIN" />

                <category android:name="android.intent.category.LAUNCHER" />
            </intent-filter>
        </activity>
    </application>

</manifest>

Output :

Search Functionality in ListView Android  Search Functionality in ListView Android

Thursday 24 November 2016

Responsive Image Grid using Materialize CSS

In this example, we are learning about how to make responsive image grid using materialize css.

Materialize css provide 12 column responsive grid. Here , I will describe you how it works.

Class name & Description :

  • col : specific a column with sub class.
  • s12 : Divide layout in  12 columns with width as 100% and it is also useful in small screen phones. (s is used for small screen)
  • m6 : Divide layout in 6 column out of 12 column for media screen phones. 
  • l3 : Divide layout in 3 column out of 12 column for large screen phones.
  • card small : to use small card which size is approx 300px.
  • card-image : to set an image in div
  • card - title : to set title on the card
  • card - content : to set a description about the card 
  • card-action : to set link in footer of the card


Let's see the example how it works

File name : demo.php

  1
  2
  3
  4
  5
  6
  7
  8
  9
 10
 11
 12
 13
 14
 15
 16
 17
 18
 19
 20
 21
 22
 23
 24
 25
 26
 27
 28
 29
 30
 31
 32
 33
 34
 35
 36
 37
 38
 39
 40
 41
 42
 43
 44
 45
 46
 47
 48
 49
 50
 51
 52
 53
 54
 55
 56
 57
 58
 59
 60
 61
 62
 63
 64
 65
 66
 67
 68
 69
 70
 71
 72
 73
 74
 75
 76
 77
 78
 79
 80
 81
 82
 83
 84
 85
 86
 87
 88
 89
 90
 91
 92
 93
 94
 95
 96
 97
 98
 99
100
101
102
103
104
105
106
107
108
109
110
111
112
113
114
115
116
117
118
119
120
121
122
123
124
125
126
127
128
129
130
131
132
133
134
135
136
137
138
139
140
141
142
143
144
145
<html>
<head>
    <link rel="stylesheet" href="css/materialize.css" type="text/css">
    <script src="js/materialize.js" type="text/javascript"></script>
</head>

<body>
<div class="row">
          <div class="col s12 m6 l3">
            <h4 class="light">Small Card</h4>
            <div class="card small">
              <div class="card-image">
                <img src="images/1.jpg">
                <span class="card-title">Title</span>
              </div>
              <div class="card-content">
                <p>Welcome to Desire Code</p>
              </div>
              <div class="card-action">
                <a href="#">Click here</a>
                <a href="#">Click here</a>
              </div>
            </div>
</div>
<div class="row">
          <div class="col s12 m6 l3">
            <h4 class="light">Small Card</h4>
            <div class="card small">
              <div class="card-image">
                <img src="images/2.jpg">
                <span class="card-title">Title</span>
              </div>
              <div class="card-content">
                <p>Welcome to Desire Code</p>
              </div>
              <div class="card-action">
                <a href="#">Click here</a>
                <a href="#">Click here</a>
              </div>
            </div>
</div>
<div class="row">
          <div class="col s12 m6 l3">
            <h4 class="light">Small Card</h4>
            <div class="card small">
              <div class="card-image">
                <img src="images/3.jpg">
                <span class="card-title">Title</span>
              </div>
              <div class="card-content">
                <p>Welcome to Desire Code</p>
              </div>
              <div class="card-action">
                <a href="#">Click here</a>
                <a href="#">Click here</a>
              </div>
            </div>
</div>
<div class="row">
          <div class="col s12 m6 l3">
            <h4 class="light">Small Card</h4>
            <div class="card small">
              <div class="card-image">
                <img src="images/4.jpg">
                <span class="card-title">Title</span>
              </div>
              <div class="card-content">
                <p>Welcome to Desire Code</p>
              </div>
              <div class="card-action">
                <a href="#">Click here</a>
                <a href="#">Click here</a>
              </div>
            </div>
</div>
<div class="row">
          <div class="col s12 m6 l3">
            <h4 class="light">Small Card</h4>
            <div class="card small">
              <div class="card-image">
                <img src="images/5.jpg">
                <span class="card-title">Title</span>
              </div>
              <div class="card-content">
                <p>Welcome to Desire Code</p>
              </div>
              <div class="card-action">
                <a href="#">Click here</a>
                <a href="#">Click here</a>
              </div>
            </div>
</div>
<div class="row">
          <div class="col s12 m6 l3">
            <h4 class="light">Small Card</h4>
            <div class="card small">
              <div class="card-image">
                <img src="images/6.jpg">
                <span class="card-title">Title</span>
              </div>
              <div class="card-content">
                <p>Welcome to Desire Code</p>
              </div>
              <div class="card-action">
                <a href="#">Click here</a>
                <a href="#">Click here</a>
              </div>
            </div>
</div>
<div class="row">
          <div class="col s12 m6 l3">
            <h4 class="light">Small Card</h4>
            <div class="card small">
              <div class="card-image">
                <img src="images/7.jpg">
                <span class="card-title">Title</span>
              </div>
              <div class="card-content">
                <p>Welcome to Desire Code</p>
              </div>
              <div class="card-action">
                <a href="#">Click here</a>
                <a href="#">Click here</a>
              </div>
            </div>
</div>
<div class="row">
          <div class="col s12 m6 l3">
            <h4 class="light">Small Card</h4>
            <div class="card small">
              <div class="card-image">
                <img src="images/8.jpg">
                <span class="card-title">Title</span>
              </div>
              <div class="card-content">
                <p>Welcome to Desire Code</p>
              </div>
              <div class="card-action">
                <a href="#">Click here</a>
                <a href="#">Click here</a>
              </div>
            </div>
</div>
</body>
</html>

Output :
Materialize Grid

Sunday 20 November 2016

Add Comment without reloading page using php

In this example, today we are learning about how to post comment without reloading page in php.

When you click on the button , then comment will be post without reloading the page and this comment will be added in div. We are also using materialize css file for designing.

If there are large amount of comment will be post then scrolling also available in the div.

Now, Let's see the example :


File name : demo.php


 1
 2
 3
 4
 5
 6
 7
 8
 9
10
11
12
13
14
15
16
17
18
19
20
21
22
23
24
25
26
27
28
29
30
31
32
33
34
35
36
37
38
39
40
41
42
43
44
45
46
47
48
49
<!DOCTYPE HTML>

<html>
<head>
 <meta http-equiv="Content-Type" content="text/html; charset=utf-8" />
    
 <meta name=viewport content="width=device-width, initial-scale=1">            
 <title>Ajax Comment Demo</title>

    <link rel="stylesheet" href="css/materialize.css" type="text/css">
    
    <script src="js/jquery.js"></script>
    <script src="js/materialize.min.js" type="text/javascript"></script>
 
 <script type="text/javascript">
  $( document ).ready(function(){
   $("#btn1").click(function(){
    var commentDivContent=$('#commentDiv').html();
    var newComment=$('#textarea1').val().replace(/\n/g, "<br />");
    
    $("#commentDiv").html("<div class='card col s11 input-field'>"+newComment+"</div>"+commentDivContent);
   });
  });
 </script>

</head>
<body>
 
 <nav class="nav-material blue">
  <div class="nav-wrapper">
     <a href="#" class="brand-logo center">Comment Without Refresh Demo</a>
  </div>
 </nav>
 
    <div class="container" style="margin-top:5px;">
  <div class="row">
   <div class="input-field col s11">
    <textarea id="textarea1" class="materialize-textarea"></textarea>
    <label for="textarea1">Add Comment</label>
   </div>
   <div class="input-field col s1">
    <input type="button" id="btn1" class="btn blue" value="Add Comment">
   </div>
  </div>
  <div class= "row" id="commentDiv" style="max-height: 200px;overflow-y: scroll;">
  </div>
 </div>
</body>
</html>


Output :

Ajax Comment Demo

Download CSS & JS File : Click Here

Saturday 5 November 2016

Create Tab Layout with Swipeable view in Android

In this example, we will demonstrate that how to create tab layout with swipeable view.

Basically, we are using ViewPager and Fragement for creating swipeable view. ViewPager is used for main layout and Fragement is used for individual page viewer.

Let's see the example with steps :

First of all, create a new project File -> new -> Android Application Project and set the name of the project.

In MainActivity file , change activity and set FragementActivity, then add unimplemented methods and implement ActionBar.TabListener. Now see the code of MainActivity.

File Name : MainActivity.java

 1
 2
 3
 4
 5
 6
 7
 8
 9
10
11
12
13
14
15
16
17
18
19
20
21
22
23
24
25
26
27
28
29
30
31
32
33
34
35
36
37
38
39
40
41
42
43
44
45
46
47
48
49
50
51
52
53
54
55
56
57
58
59
60
61
62
63
64
65
66
67
68
69
70
71
72
73
74
75
76
77
78
79
80
81
82
package com.example.swipingtab;

import android.app.ActionBar;
import android.app.ActionBar.Tab;
import android.app.Activity;
import android.app.FragmentTransaction;
import android.os.Bundle;
import android.support.v4.app.FragmentActivity;
import android.support.v4.view.ViewPager;
import android.view.Menu;

public class MainActivity extends FragmentActivity implements ActionBar.TabListener{
 
 ActionBar actionbar; //for adding tab into actionbar
 ViewPager viewpager;
 FragementPageAdapter fa;

 @Override
 protected void onCreate(Bundle savedInstanceState) {
  super.onCreate(savedInstanceState);
  setContentView(R.layout.activity_main);
  
  actionbar = getActionBar();
  viewpager = (ViewPager) findViewById(R.id.pager);
  fa = new FragementPageAdapter(getSupportFragmentManager());
  viewpager.setAdapter(fa);
  actionbar.setNavigationMode(ActionBar.NAVIGATION_MODE_TABS);
  actionbar.addTab(actionbar.newTab().setText("TAB 1").setTabListener(this));
  actionbar.addTab(actionbar.newTab().setText("TAB 2").setTabListener(this));
  actionbar.addTab(actionbar.newTab().setText("TAB 3").setTabListener(this));
  
  
  // to change the tab when page will be changed
  viewpager.setOnPageChangeListener(new ViewPager.OnPageChangeListener() {
   
   @Override
   public void onPageSelected(int arg0) {
    // TODO Auto-generated method stub
    
    actionbar.setSelectedNavigationItem(arg0); // it will return the id of the tab item
   }
   
   @Override
   public void onPageScrolled(int arg0, float arg1, int arg2) {
    // TODO Auto-generated method stub
    
   }
   
   @Override
   public void onPageScrollStateChanged(int arg0) {
    // TODO Auto-generated method stub
    
   }
  });
 }

 @Override
 public boolean onCreateOptionsMenu(Menu menu) {
  // Inflate the menu; this adds items to the action bar if it is present.
  getMenuInflater().inflate(R.menu.activity_main, menu);
  return true;
 }

 @Override
 public void onTabReselected(Tab arg0, FragmentTransaction arg1) {
  // TODO Auto-generated method stub
  
 }

 @Override
 public void onTabSelected(Tab arg0, FragmentTransaction arg1) {
  // TODO Auto-generated method stub
  
 }

 @Override
 public void onTabUnselected(Tab arg0, FragmentTransaction arg1) {
  // TODO Auto-generated method stub
  
 }

}

File Name : activity_main.xml


1
2
3
4
5
6
7
8
<android.support.v4.view.ViewPager xmlns:android="http://schemas.android.com/apk/res/android"
    xmlns:tools="http://schemas.android.com/tools"
    android:id="@+id/pager"
    android:layout_width="match_parent"
    android:layout_height="match_parent"
    tools:context=".MainActivity" >

</android.support.v4.view.ViewPager>

Now create an adapter class to add in Fragement. Go to Right click on src sub package ->  new -> class -> write name of the file and browse superclass FragmentPagerAdapter

File Name : FragementPageAdapter.java

 1
 2
 3
 4
 5
 6
 7
 8
 9
10
11
12
13
14
15
16
17
18
19
20
21
22
23
24
25
26
27
28
29
30
31
32
33
34
35
36
37
38
package com.example.swipingtab;

import android.support.v4.app.Fragment;
import android.support.v4.app.FragmentManager;
import android.support.v4.app.FragmentPagerAdapter;

public class FragementPageAdapter extends FragmentPagerAdapter {

 public FragementPageAdapter(FragmentManager fm) {
  super(fm);
  // TODO Auto-generated constructor stub
 }

 @Override
 public Fragment getItem(int arg0) {
  // TODO Auto-generated method stub
  
  switch (arg0) {
  case 0:
   return new Tab1(); // return Tab1 Activity
  case 1:
   return new Tab2(); // return Tab2 Activity
  case 2:
   return new Tab3(); // return Tab3 Activity
  default:
   break;
  }
  
  return null;
 }

 @Override
 public int getCount() {
  // TODO Auto-generated method stub
  return 3; // there are 3 tabs available so return 3
 }

}

Now, Create file for tab page. Go to Right click on src sub package ->  new -> class -> write name of the file and browse superclass Fragment

same as create total three files for adding three tabs.

Also create three xml file for adding three tabs. Go to Right click on res/layout ->  new -> Android XML File -> write name of the file

Now see the code of all files.

File Name : Tab1.java

 1
 2
 3
 4
 5
 6
 7
 8
 9
10
11
12
13
14
15
16
17
package com.example.swipingtab;

import android.os.Bundle;
import android.support.v4.app.Fragment;
import android.view.LayoutInflater;
import android.view.View;
import android.view.ViewGroup;

public class Tab1 extends Fragment {

 @Override
 public View onCreateView(LayoutInflater inflater, ViewGroup container,
   Bundle savedInstanceState) {
  // TODO Auto-generated method stub
  return inflater.inflate(R.layout.tab1, container,false);
 }
}

File Name : tab1.xml

 1
 2
 3
 4
 5
 6
 7
 8
 9
10
11
12
13
14
15
16
17
18
<?xml version="1.0" encoding="utf-8"?>
<RelativeLayout xmlns:android="http://schemas.android.com/apk/res/android"
    android:layout_width="match_parent"
    android:layout_height="match_parent"
    android:background="#37CB16"
    android:orientation="vertical" >

    <TextView
        android:id="@+id/textView1"
        android:layout_width="wrap_content"
        android:layout_height="wrap_content"
        android:layout_alignParentTop="true"
        android:layout_centerHorizontal="true"
        android:layout_marginTop="164dp"
        android:text="TAB 1"
        android:textAppearance="?android:attr/textAppearanceLarge" />

</RelativeLayout>

File Name : Tab2.java

 1
 2
 3
 4
 5
 6
 7
 8
 9
10
11
12
13
14
15
16
17
package com.example.swipingtab;

import android.os.Bundle;
import android.support.v4.app.Fragment;
import android.view.LayoutInflater;
import android.view.View;
import android.view.ViewGroup;

public class Tab2 extends Fragment {

 @Override
 public View onCreateView(LayoutInflater inflater, ViewGroup container,
   Bundle savedInstanceState) {
  // TODO Auto-generated method stub
  return inflater.inflate(R.layout.tab2, container,false);
 }
}

File Name : tab2.xml

 1
 2
 3
 4
 5
 6
 7
 8
 9
10
11
12
13
14
15
16
17
18
<?xml version="1.0" encoding="utf-8"?>
<RelativeLayout xmlns:android="http://schemas.android.com/apk/res/android"
    android:layout_width="match_parent"
    android:layout_height="match_parent"
    android:background="#10D8C3"
    android:orientation="vertical" >

    <TextView
        android:id="@+id/textView1"
        android:layout_width="wrap_content"
        android:layout_height="wrap_content"
        android:layout_alignParentTop="true"
        android:layout_centerHorizontal="true"
        android:layout_marginTop="164dp"
        android:text="TAB 2"
        android:textAppearance="?android:attr/textAppearanceLarge" />

</RelativeLayout>

File Name : Tab3.java


 1
 2
 3
 4
 5
 6
 7
 8
 9
10
11
12
13
14
15
16
17
18
package com.example.swipingtab;

import android.os.Bundle;
import android.support.v4.app.Fragment;
import android.view.LayoutInflater;
import android.view.View;
import android.view.ViewGroup;

public class Tab3 extends Fragment {

 @Override
 public View onCreateView(LayoutInflater inflater, ViewGroup container,
   Bundle savedInstanceState) {
  // TODO Auto-generated method stub
  return inflater.inflate(R.layout.tab3, container,false);
 }
 
}

File Name : tab3.xml


 1
 2
 3
 4
 5
 6
 7
 8
 9
10
11
12
13
14
15
16
17
18
<?xml version="1.0" encoding="utf-8"?>
<RelativeLayout xmlns:android="http://schemas.android.com/apk/res/android"
    android:layout_width="match_parent"
    android:layout_height="match_parent"
    android:background="#D810BA"
    android:orientation="vertical" >

    <TextView
        android:id="@+id/textView1"
        android:layout_width="wrap_content"
        android:layout_height="wrap_content"
        android:layout_alignParentTop="true"
        android:layout_centerHorizontal="true"
        android:layout_marginTop="164dp"
        android:text="TAB 3"
        android:textAppearance="?android:attr/textAppearanceLarge" />

</RelativeLayout>

Output :

Desire Code Tab Layout Desire Code Tab Layout1 Desire Code Tab Layout2


Like us on Facebook

Site Visitor

Powered by Blogger.