Android Tutorial , Programming Tutorial, Php Tutorial, Learn Android, HTML Tutorial, Coding , Java Tutorial, GTU Programs, Learning Programming

Showing posts with label Gtu Android Practical. Show all posts

Wednesday, 21 September 2016

Custom ListView with images and text in Android

ListView is one type of View that enables to display items in list format. It displays a list of items in a vertical scroll list. It is a versatile control that we can customize.

So, Now we are going to learn about how to create custom listview. Each row in a particular listview using a separate layout.

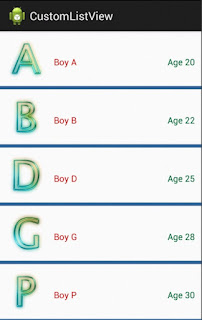
First of all, In this example , there are 3 colums used in custom listview example. First column display an images. Second column display name of the person and Third colums display age of the person. To use image example put images in res/drawable folder.

Let's See the Example :

File Name : MainActivity.java


 1
 2
 3
 4
 5
 6
 7
 8
 9
10
11
12
13
14
15
16
17
18
19
20
21
22
23
24
25
26
27
28
29
30
31
32
33
34
35
36
37
38
39
40
41
42
package com.example.customlistview;

import android.os.Bundle;
import android.app.Activity;
import android.view.Menu;
import android.widget.ListView;

public class MainActivity extends Activity {

 ListView listview;
 int[] image = {R.drawable.a,R.drawable.b,R.drawable.d,R.drawable.g,R.drawable.p};
 String[] name = {"Boy A","Boy B","Boy D","Boy G","Boy P"};
 String[] details = {"Age 20","Age 22","Age 25","Age 28","Age 30"};
 
 
 @Override
 protected void onCreate(Bundle savedInstanceState) {
  super.onCreate(savedInstanceState);
  setContentView(R.layout.activity_main);
  
  listview = (ListView)findViewById(R.id.ListView);
  NameAdapter adapater = new NameAdapter(getApplicationContext(), R.layout.row_layout);
  listview.setAdapter(adapater);
  int i = 0;
  for(String Name : name)
  {
   NameClass obj = new NameClass(image[i], Name, details[i]);
   adapater.add(obj);
   i++;
   
  }
  
 }

 @Override
 public boolean onCreateOptionsMenu(Menu menu) {
  // Inflate the menu; this adds items to the action bar if it is present.
  getMenuInflater().inflate(R.menu.activity_main, menu);
  return true;
 }

}


NameAdapter.java File is using for need of Handling ListView using ArrayAdapter. So, Create a new java file. To create a new java file follow steps : to right click on package->new->class-> write name of file and click Finish


File Name : NameAdapter.java


 1
 2
 3
 4
 5
 6
 7
 8
 9
10
11
12
13
14
15
16
17
18
19
20
21
22
23
24
25
26
27
28
29
30
31
32
33
34
35
36
37
38
39
40
41
42
43
44
45
46
47
48
49
50
51
52
53
54
55
56
57
58
59
60
61
62
63
64
65
66
67
68
69
70
71
72
73
74
75
76
77
78
79
package com.example.customlistview;

import java.util.ArrayList;
import java.util.List;

import android.content.Context;
import android.view.LayoutInflater;
import android.view.View;
import android.view.ViewGroup;
import android.widget.ArrayAdapter;
import android.widget.ImageView;
import android.widget.TextView;

public class NameAdapter extends ArrayAdapter {

 private List list = new ArrayList();
 
 
 public NameAdapter(Context context, int textViewResourceId) {
  super(context, textViewResourceId);
  // TODO Auto-generated constructor stub
 }
 
 public void add(NameClass object) {
  // TODO Auto-generated method stub
  list.add(object);
  super.add(object);
  
 }
 static class imgHolder
 {
  ImageView IMG;
  TextView NAME,DETAIL;
  
 }
 @Override
 public int getCount() {
  // TODO Auto-generated method stub
  
  return this.list.size();
 }
 
 @Override
 public Object getItem(int position) {
  // TODO Auto-generated method stub
  return this.list.get(position);
 }
 
 @Override
 public View getView(int position, View convertView, ViewGroup parent) {
  // TODO Auto-generated method stub
  
  View row;
  row = convertView;
  imgHolder holder;
  if(convertView==null)
  {
   
  
  LayoutInflater inflater = (LayoutInflater)this.getContext().getSystemService(Context.LAYOUT_INFLATER_SERVICE);
  row =  inflater.inflate(R.layout.row_layout, parent,false);
  holder = new imgHolder();
  holder.IMG = (ImageView) row.findViewById(R.id.image);
  holder.NAME = (TextView) row.findViewById(R.id.name);
  holder.DETAIL = (TextView)row.findViewById(R.id.detail);
  row.setTag(holder);
  }
  else
  {
   holder = (imgHolder) row.getTag();
   
  }
  NameClass n = (NameClass) getItem(position);
  holder.IMG.setImageResource(n.getName_resource());
  holder.NAME.setText(n.getPerson_name());
  holder.DETAIL.setText(n.getPerson_details());
  return row;
 }
}


we need an object that is capable of handling one row particular in listview. So we create a separate class.To create a new java file follow steps : to right click on package->new->class-> write name of file and click Finish

File Name : NameClass.java


 1
 2
 3
 4
 5
 6
 7
 8
 9
10
11
12
13
14
15
16
17
18
19
20
21
22
23
24
25
26
27
28
29
30
31
32
33
34
35
36
37
package com.example.customlistview;

public class NameClass {

 private int name_resource;
 private String person_name;
 private String person_details;


 public NameClass(int name_resource, String person_name,
   String person_details) {
  super();
  this.setName_resource(name_resource);
  this.setPerson_name(person_name);
  this.setPerson_details(person_details);
 }
 public int getName_resource() {
  return name_resource;
 }
 public void setName_resource(int name_resource) {
  this.name_resource = name_resource;
 }
 public String getPerson_name() {
  return person_name;
 }
 public void setPerson_name(String person_name) {
  this.person_name = person_name;
 }
 public String getPerson_details() {
  return person_details;
 }
 public void setPerson_details(String person_details) {
  this.person_details = person_details;
 }
}


To set Layout of ListView,activity_main.xml is used in this example

File Name : activity_main.xml


 1
 2
 3
 4
 5
 6
 7
 8
 9
10
11
12
13
14
15
16
17
18
<RelativeLayout xmlns:android="http://schemas.android.com/apk/res/android"
    xmlns:tools="http://schemas.android.com/tools"
    android:layout_width="fill_parent"
    android:layout_height="match_parent"
    android:orientation="vertical"
    tools:context=".MainActivity" >

    
<ListView 
    android:id="@+id/ListView"
    android:layout_width="match_parent"
    android:layout_height="match_parent"
    android:layout_marginBottom="0dp"
    android:layout_marginTop="0dp"
    android:dividerHeight="5dp"
    android:divider="#336699"></ListView>
    
</RelativeLayout>


To set separate layout for individual row on this listview, we have to create new xml file. Follow Step to create new xml file : To Right Click on layout -> new ->  Android XML File -> set name of File and the Click on Finish.

File Name : row_layout.xml


 1
 2
 3
 4
 5
 6
 7
 8
 9
10
11
12
13
14
15
16
17
18
19
20
21
22
23
24
25
26
27
28
29
30
31
32
33
34
35
36
37
38
39
40
41
42
43
<?xml version="1.0" encoding="utf-8"?>
<RelativeLayout xmlns:android="http://schemas.android.com/apk/res/android"
    android:layout_width="fill_parent"
    android:layout_height="fill_parent"
    android:layout_marginTop="0dp"
    android:layout_marginBottom="0dp"
    android:focusableInTouchMode="true"
     >
    
    <ImageView
        android:id="@+id/image"
        android:layout_height="wrap_content"
        android:layout_width="wrap_content"
        android:layout_centerVertical="true"
        android:paddingRight="10dp"
        android:paddingTop="10dp"
        android:paddingBottom="10dp"
  android:paddingLeft="10dp"
  android:scaleType="centerCrop"
        />

    <TextView
        android:id="@+id/name"
        android:layout_height="wrap_content"
        android:layout_width="wrap_content"
        android:layout_toRightOf="@+id/image"
        android:layout_centerVertical="true"
        android:paddingTop="10dp"
        android:textColor="#CC0000"
        />
    
    <TextView
        android:id="@+id/detail"
        android:layout_height="wrap_content"
        android:layout_width="wrap_content"
        android:layout_alignParentRight="true"
        android:layout_centerVertical="true"
        android:paddingTop="10dp"
  android:paddingRight="10dp"
  android:textColor="#006633"
  
        />
</RelativeLayout>


Output :

CustomListView

Saturday, 10 September 2016

Android Tutorial : ScrollView Example

Scroll View is a special type of layout which is enables users to scroll through a list of views.It can contain only one child view or ViewGroup.


  • Modify the content of activity_main.xml file and show the ScrollView with LinearLayout

File Name : activity_main.xml


 1
 2
 3
 4
 5
 6
 7
 8
 9
10
11
12
13
14
15
16
17
18
19
20
21
22
23
24
25
26
27
28
29
30
31
32
33
34
35
36
37
38
39
40
41
42
43
44
45
46
47
48
49
50
51
52
53
54
55
56
57
58
59
60
61
<?xml version="1.0" encoding="utf-8"?>
<ScrollView
    android:layout_width="fill_parent"
    android:layout_height="fill_parent"
    xmlns:android="http://schemas.android.com/apk/res/android"
    >
    <LinearLayout
        android:layout_width="fill_parent"
        android:layout_height="fill_parent"
        android:orientation="vertical">
    <TextView
        android:id="@+id/title"
        android:layout_width="fill_parent"
        android:text="Scroll View Example"
        android:gravity="center"
        android:textSize="20dp"
        android:layout_height="fill_parent"/>
    
    <EditText
        android:id="@+id/fname"
        android:layout_width="fill_parent"
        android:hint="Enter First Name"
        android:layout_height="300px"/>
        
    <EditText
        android:id="@+id/mname"
        android:layout_width="fill_parent"
        android:hint="Enter Middle Name"
        android:layout_height="300px"/>
    
    <EditText
        android:id="@+id/lname"
        android:layout_width="fill_parent"
        android:hint="Enter Last Name"
        android:layout_height="300px"/>
    
    <EditText
        android:id="@+id/message"
        android:layout_width="fill_parent"
        android:hint="Write Your Text Message"
        android:layout_height="300px"/>
    
    <EditText
        android:id="@+id/suggestion"
        android:layout_width="fill_parent"
        android:hint="Write Your Suggestion"
        android:layout_height="300px"/>
    
    <Button
        android:id="@+id/submit"
        android:layout_width="fill_parent"
        android:layout_height="wrap_content"
        android:text="Submit"/>
    <Button
        android:id="@+id/cancel"
        android:layout_width="fill_parent"
        android:layout_height="wrap_content"
        android:text="Cancel"/>
            
    </LinearLayout>
    </ScrollView>

Output:

 ScrollView  ScrollView1

Android Tutorial : Auto Complete TextView Example

AutoCompleteTextView is a one type of view which is like EditText. It shows a list of suggested word automatically while user is typing.

This type of editable textview automatically give suggestion when user typing. Sugessted word display in dropdown list. It is subclass of EditText Class.

In this example, we are explaining programming code of autocomplete textview. We are using Array Adapter for hold string array and display content of array.

There are given here some steps. Follow the steps and let's see the example


Step :1 Add the following statement in the MainActivity.java file :

File Name : MainActivity.java


 1
 2
 3
 4
 5
 6
 7
 8
 9
10
11
12
13
14
15
16
17
18
19
20
21
22
23
24
25
26
27
28
29
30
31
32
package com.example.autocomplete;

import android.os.Bundle;
import android.app.Activity;
import android.view.View;
import android.widget.AdapterView;
import android.widget.AdapterView.OnItemClickListener;
import android.widget.ArrayAdapter;
import android.widget.AutoCompleteTextView;
import android.widget.Toast;

public class MainActivity extends Activity {

   private AutoCompleteTextView autoComplete;
  private ArrayAdapter<String> adapter;
 
 @Override
 protected void onCreate(Bundle savedInstanceState) {
  super.onCreate(savedInstanceState);
  setContentView(R.layout.activity_main);
  
  String[] birds = getResources().getStringArray(R.array.birds);
  
  adapter = new ArrayAdapter<String>(this,android.R.layout.simple_list_item_1,birds);

   autoComplete = (AutoCompleteTextView) findViewById(R.id.autoComplete);

   autoComplete.setAdapter(adapter);
  autoComplete.setThreshold(1); //minimum type of characters before drop-down list is shown

  }
}


Step 2 : Modify the strings.xml file located in the res/values folder as shown here :

File Name : strings.xml

 1
 2
 3
 4
 5
 6
 7
 8
 9
10
11
12
13
14
15
16
17
18
<?xml version="1.0" encoding="utf-8"?>
<resources>

    <string name="app_name">AutoComplete</string>
    <string name="hello_world">Hello world!</string>
    <string name="menu_settings">Settings</string>
 <string name="textName">Auto Complete TextView Example</string>
 
     <string-array name="birds">
    <item >Dove</item>
        <item >Duck</item>
        <item >Sparrow</item>
        <item >Parrot</item>
        <item >Pigeon</item>
        <item >Crow</item>
        <item >Peacock</item>
    </string-array>
</resources>


Step 3 : Modify the activity_main.xml file located in the res/layout folder as shown here :


File Name : activity_main.xml

 1
 2
 3
 4
 5
 6
 7
 8
 9
10
11
12
13
14
15
16
17
18
19
20
21
22
23
24
25
<RelativeLayout xmlns:android="http://schemas.android.com/apk/res/android"
    xmlns:tools="http://schemas.android.com/tools"
    android:layout_width="match_parent"
    android:layout_height="match_parent"
    tools:context=".MainActivity" >

    <TextView
        android:id="@+id/text1"
        android:layout_width="wrap_content"
        android:layout_height="wrap_content"
        android:layout_alignParentTop="true"
        android:layout_centerHorizontal="true"
        android:text="@string/textName"
        android:textAppearance="?android:attr/textAppearanceMedium" />

    <AutoCompleteTextView
        android:id="@+id/autoComplete"
        android:layout_width="wrap_content"
        android:layout_height="wrap_content"
        android:layout_below="@+id/text1"
        android:layout_centerHorizontal="true"
        android:layout_marginTop="36dp"
        android:ems="8" />

</RelativeLayout>


Output :


Auto Complete TextView


Android Tutorial : Toast Example

Android Toast is used to display small pop up information for short time. It contain message to display some information.In this example , we will show that how to display message using toast.

android.widget.Toast class is the subclass of the java.lang.Object class. We can also create our custom toast like we can add image and text in toast and display on the top of the activity or bottom or center can also.

There are some constant of the toast class :

  • LENGTH_SHORT : display toast for the short time.
  • LENGTH_LONG : display toast for the long time.


There are some methods of the toast class :


  • public static Toast makeText(Context context, CharSequence text, int duration) :
    • used for set message of the toast and duration of the toast to display on view.

  • public void show() :
    • used for display toast on activity.

  • public void setMargin (float horizontalMargin, float verticalMargin) :
    • used to set horizontal and vertical margin.


File Name : MainActivity.java


 1
 2
 3
 4
 5
 6
 7
 8
 9
10
11
12
13
14
15
16
17
18
19
20
21
22
23
24
25
package com.example.toastexample;

import android.app.Activity;
import android.os.Bundle;
import android.view.Menu;
import android.widget.Toast;

public class MainActivity extends Activity {

  @Override
 protected void onCreate(Bundle savedInstanceState) {
  super.onCreate(savedInstanceState);
  setContentView(R.layout.activity_main);
  
  Toast.makeText(getApplicationContext(),"Welcome to Desire Code",Toast.LENGTH_SHORT).show();
 }

  @Override
 public boolean onCreateOptionsMenu(Menu menu) {
  // Inflate the menu; this adds items to the action bar if it is present.
  getMenuInflater().inflate(R.menu.activity_main, menu);
  return true;
 }

}
Output:


Toast

Monday, 5 September 2016

Write a Program to change background color using Radio Button in android

In this Example, There are three radio button use in this program. On click of radio button background color of view will be changed as per name. For ex. on yellow radio button select background color will be change and yellow color set. Here, design file and code file is describe here and output of the program also display in below.

There are RadioGroup is used in the example. RadioGroup is used for radio button in group format. All radio buttons are used under RadioGroup.

File Name : MainActivity.java


 1
 2
 3
 4
 5
 6
 7
 8
 9
10
11
12
13
14
15
16
17
18
19
20
21
22
23
24
25
26
27
28
29
30
31
32
33
34
35
36
37
38
39
40
41
42
43
44
45
46
47
48
49
package com.example.radiobtn;

import android.os.Bundle;
import android.app.Activity;
import android.graphics.Color;
import android.view.Menu;
import android.view.View;
import android.widget.RadioGroup;

public class MainActivity extends Activity {

  
 RadioGroup rg;
 
 @Override
 protected void onCreate(Bundle savedInstanceState) {
  super.onCreate(savedInstanceState);
  setContentView(R.layout.activity_main);
  
  rg=(RadioGroup)findViewById(R.id.radioGroup1);
 
 }

  @Override
 public boolean onCreateOptionsMenu(Menu menu) {
  // Inflate the menu; this adds items to the action bar if it is present.
  getMenuInflater().inflate(R.menu.activity_main, menu);
  return true;
 }
 
 public void onClick(View v)
 {
  View root=v.getRootView();
   switch(rg.getCheckedRadioButtonId())
   {
         case R.id.radio0:
      root.setBackgroundColor(Color.YELLOW);
      break;
      
         case R.id.radio1:
      root.setBackgroundColor(Color.MAGENTA);
      break;

          case R.id.radio2:
      root.setBackgroundColor(Color.CYAN);
      break;
   }
 }
}


File Name : activity_main.xml


 1
 2
 3
 4
 5
 6
 7
 8
 9
10
11
12
13
14
15
16
17
18
19
20
21
22
23
24
25
26
27
28
29
30
31
32
33
34
35
36
37
38
<RelativeLayout xmlns:android="http://schemas.android.com/apk/res/android"
    xmlns:tools="http://schemas.android.com/tools"
    android:layout_width="match_parent"
    android:layout_height="match_parent"
    tools:context=".MainActivity" >

    <RadioGroup
        android:id="@+id/radioGroup1"
        android:layout_width="wrap_content"
        android:layout_height="wrap_content"
        android:layout_centerHorizontal="true"
        android:layout_centerVertical="true" >
       
        <RadioButton
            android:id="@+id/radio0"
            android:layout_width="wrap_content"
            android:layout_height="wrap_content"
            android:onClick="onClick"
            android:text="@string/yellow" />

        <RadioButton
            android:id="@+id/radio1"
            android:layout_width="wrap_content"
            android:layout_height="wrap_content"
            android:onClick="onClick"
            android:text="@string/magenta" />

        <RadioButton
            android:id="@+id/radio2"
            android:layout_width="wrap_content"
            android:layout_height="wrap_content"
            android:onClick="onClick"
            android:text="@string/cyan" />

    </RadioGroup>


</RelativeLayout>

Output :

Change Background Color in Android

Like us on Facebook

Site Visitor

Powered by Blogger.