Android Tutorial : Auto Complete TextView Example
|
11:55 |
No Comments |
![]()
AutoCompleteTextView is a one type of view which is like EditText. It shows a list of suggested word automatically while user is typing.
This type of editable textview automatically give suggestion when user typing. Sugessted word display in dropdown list. It is subclass of EditText Class.
In this example, we are explaining programming code of autocomplete textview. We are using Array Adapter for hold string array and display content of array.
There are given here some steps. Follow the steps and let's see the example
Step :1 Add the following statement in the MainActivity.java file :
Step 2 : Modify the strings.xml file located in the res/values folder as shown here :
Step 3 : Modify the activity_main.xml file located in the res/layout folder as shown here :
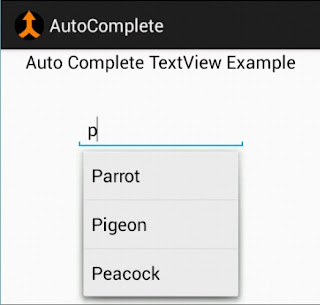
Output :
This type of editable textview automatically give suggestion when user typing. Sugessted word display in dropdown list. It is subclass of EditText Class.
In this example, we are explaining programming code of autocomplete textview. We are using Array Adapter for hold string array and display content of array.
There are given here some steps. Follow the steps and let's see the example
Step :1 Add the following statement in the MainActivity.java file :
File Name : MainActivity.java
1 2 3 4 5 6 7 8 9 10 11 12 13 14 15 16 17 18 19 20 21 22 23 24 25 26 27 28 29 30 31 32 | package com.example.autocomplete; import android.os.Bundle; import android.app.Activity; import android.view.View; import android.widget.AdapterView; import android.widget.AdapterView.OnItemClickListener; import android.widget.ArrayAdapter; import android.widget.AutoCompleteTextView; import android.widget.Toast; public class MainActivity extends Activity { private AutoCompleteTextView autoComplete; private ArrayAdapter<String> adapter; @Override protected void onCreate(Bundle savedInstanceState) { super.onCreate(savedInstanceState); setContentView(R.layout.activity_main); String[] birds = getResources().getStringArray(R.array.birds); adapter = new ArrayAdapter<String>(this,android.R.layout.simple_list_item_1,birds); autoComplete = (AutoCompleteTextView) findViewById(R.id.autoComplete); autoComplete.setAdapter(adapter); autoComplete.setThreshold(1); //minimum type of characters before drop-down list is shown } } |
Step 2 : Modify the strings.xml file located in the res/values folder as shown here :
File Name : strings.xml
1 2 3 4 5 6 7 8 9 10 11 12 13 14 15 16 17 18 | <?xml version="1.0" encoding="utf-8"?> <resources> <string name="app_name">AutoComplete</string> <string name="hello_world">Hello world!</string> <string name="menu_settings">Settings</string> <string name="textName">Auto Complete TextView Example</string> <string-array name="birds"> <item >Dove</item> <item >Duck</item> <item >Sparrow</item> <item >Parrot</item> <item >Pigeon</item> <item >Crow</item> <item >Peacock</item> </string-array> </resources> |
Step 3 : Modify the activity_main.xml file located in the res/layout folder as shown here :
File Name : activity_main.xml
1 2 3 4 5 6 7 8 9 10 11 12 13 14 15 16 17 18 19 20 21 22 23 24 25 | <RelativeLayout xmlns:android="http://schemas.android.com/apk/res/android" xmlns:tools="http://schemas.android.com/tools" android:layout_width="match_parent" android:layout_height="match_parent" tools:context=".MainActivity" > <TextView android:id="@+id/text1" android:layout_width="wrap_content" android:layout_height="wrap_content" android:layout_alignParentTop="true" android:layout_centerHorizontal="true" android:text="@string/textName" android:textAppearance="?android:attr/textAppearanceMedium" /> <AutoCompleteTextView android:id="@+id/autoComplete" android:layout_width="wrap_content" android:layout_height="wrap_content" android:layout_below="@+id/text1" android:layout_centerHorizontal="true" android:layout_marginTop="36dp" android:ems="8" /> </RelativeLayout> |
Output :

Android Tutorial, Auto Complete Text in Android, Auto Complete TextView in Android, Gtu Android Practical, How to Automatically complete text in textbox in android
0 comments:
Post a Comment